TyeBoi
New member
How To Guide
Disclaimer:
This guide was done myself on my own car. I do not work at a garage and have only learnt how to do this job through experience. It is aimed at enthusiasts willing to do the dirty work themselves and avoid those hideous labour charges. Do not attempt any work upon your car without understanding fully what is involved. Never attempt anything without making sure you know exactly what you are doing and that you have the correct tools. Never endanger yourself or others through in-propper use of tools and the lack of safety equipment. I am stating now that any damage done to yourself or your car while using this guide is 100% your fault and if you dont agree then stop reading now.
On a lighter note I am more than happy to help anybody with questions and offer advice.
Please only comment with constructive criticism or appraisal. I have already stated I am not garage trained.
Recommended Equipment
Allen Keys
Spring Compressors (The 2 hook type are better)
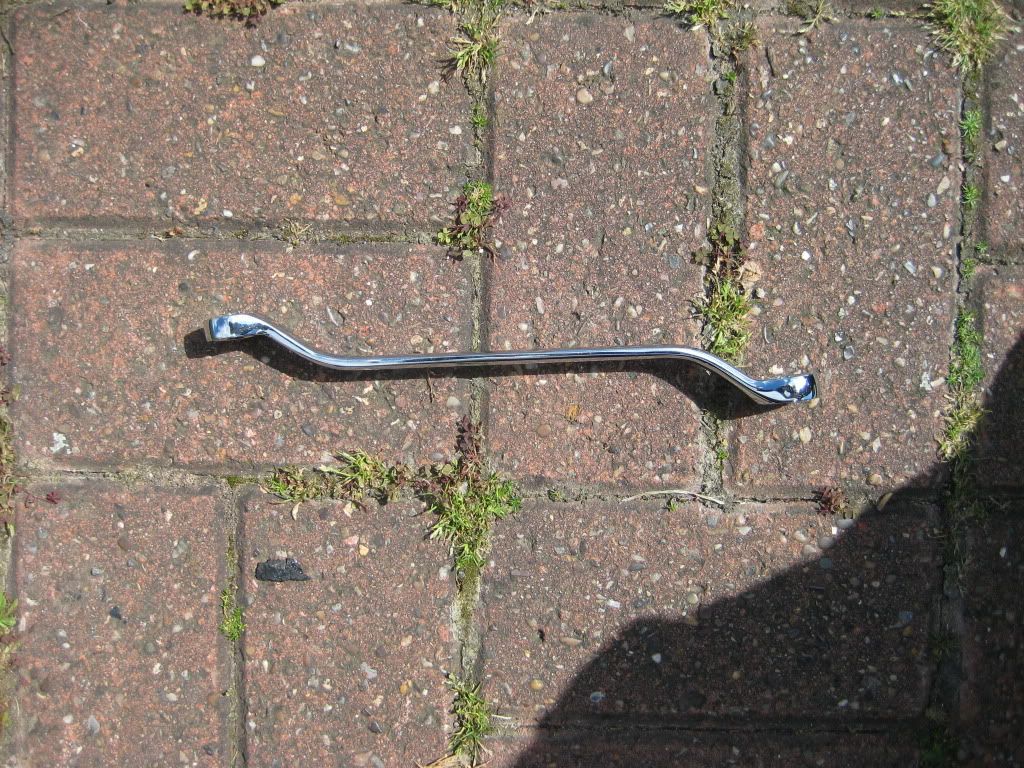
15mm Deep Offset Spanner. ( A must for any puma with interior )
Trolley Jack
Axle Stands
Socket Set
Impact Wrench (Would make things a lot easier)
WD40
Copper Grease (Would advice)
Various Other basic Tools like screwdrivers and pliers may come in handy
Mole Grips (a MUST)
Torque Wrench (if torque settings are known then use one)
Mallet
Assorted Spanners
Step by step guide to changing suspension.
This guide shows you how to fit aftermarket coilovers to your puma.
This guide could also help when fitting springs and dampers and/or repairing original suspension.
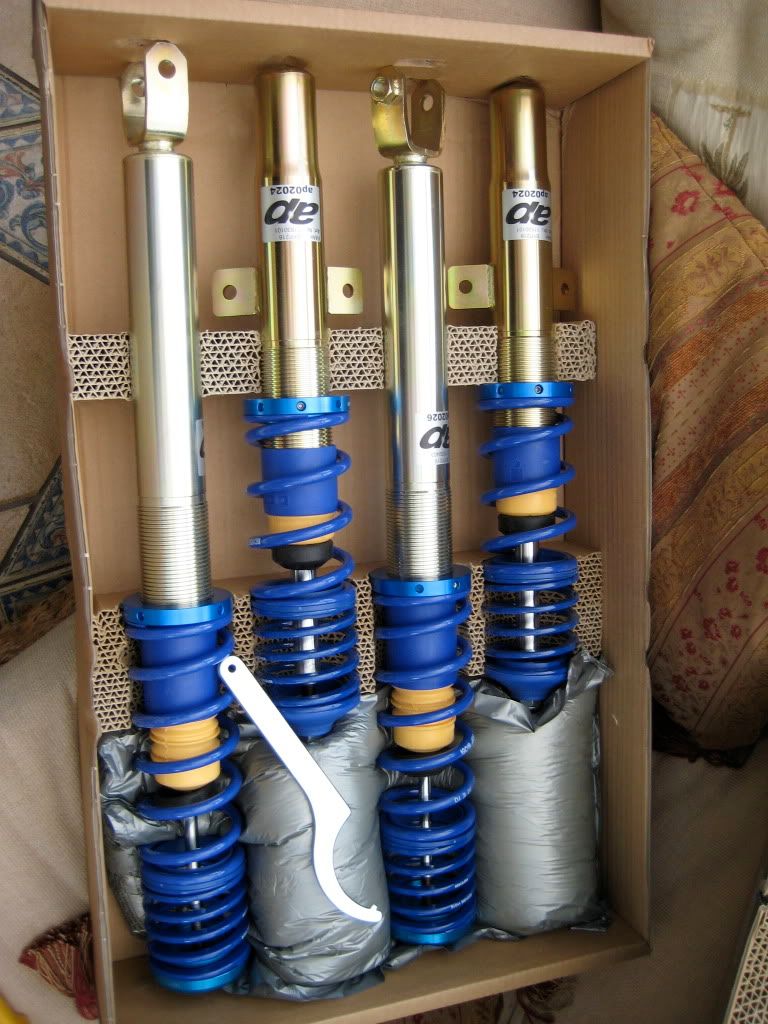
I fitted AP Coilovers bought through AP's own website which directs you to Venom Motorsport.
They cost me £422 and I bought the ones with a fork mounted rear end.
97 > 99 Pumas have an axle with fork mountings and the pumas made from then on have an eye mounted rear setup.
Those with eagle eyes will notice my Puma was made in 2000 and but has a older axle. This was due to another suspension issue I covered within my project thread.
Ok lets start.
I will start with the back suspension as its the easiest but before you touch that jack remove the locking wheel nuts off all the wheels. You will thank me later.

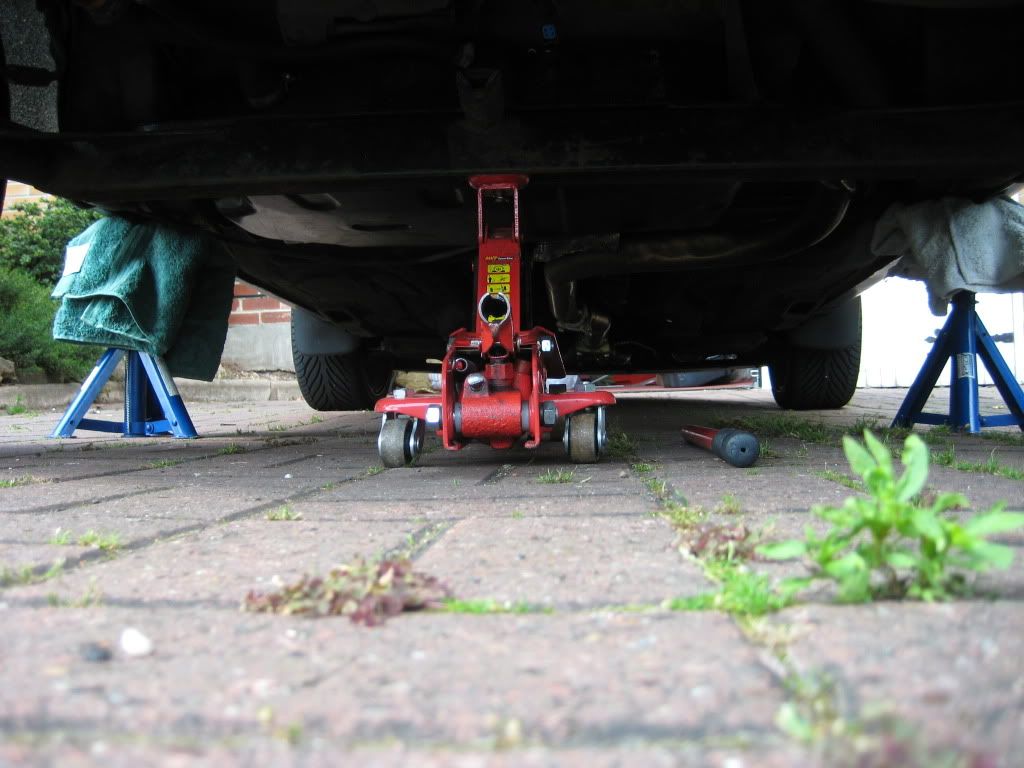
Ok so now thats done you can start jacking the car up.
Place the trolley jack at either end of the rear axle (NOT in the middle) and pump it up to its maximum. You need the rear axle to move freely so I use the jacking points on the sills to put my axle stands. I like to use a thick layer of padding ( I use towels ) to protect them a little and help spread the load.
Repeat on the other side of the axle to have the end hanging in the air on axle stands. You may want to wedge something infront of the front wheels to stop them moving but if you are on a flat surface I wouldn't be too worried about this.
TIP Once the rear end is jacked up place the trolley jack under the axle in the middle but without any weight being taken. This will benefit you later.
Undo all the wheel nuts on the back 2 wheels and remove the wheels.
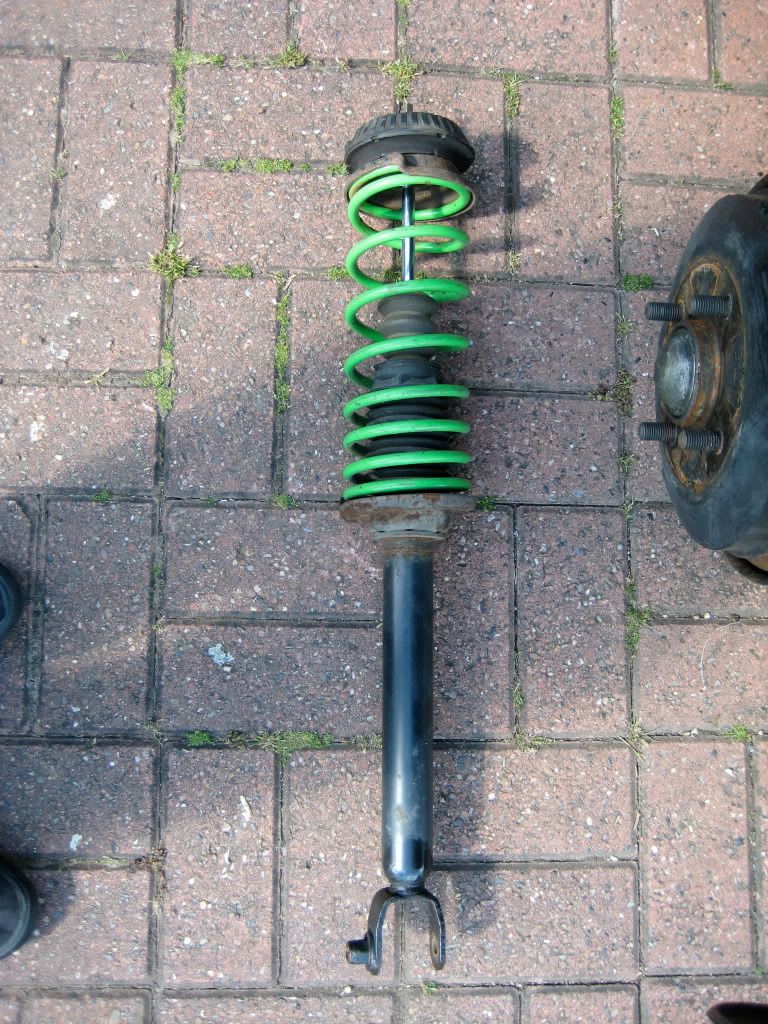
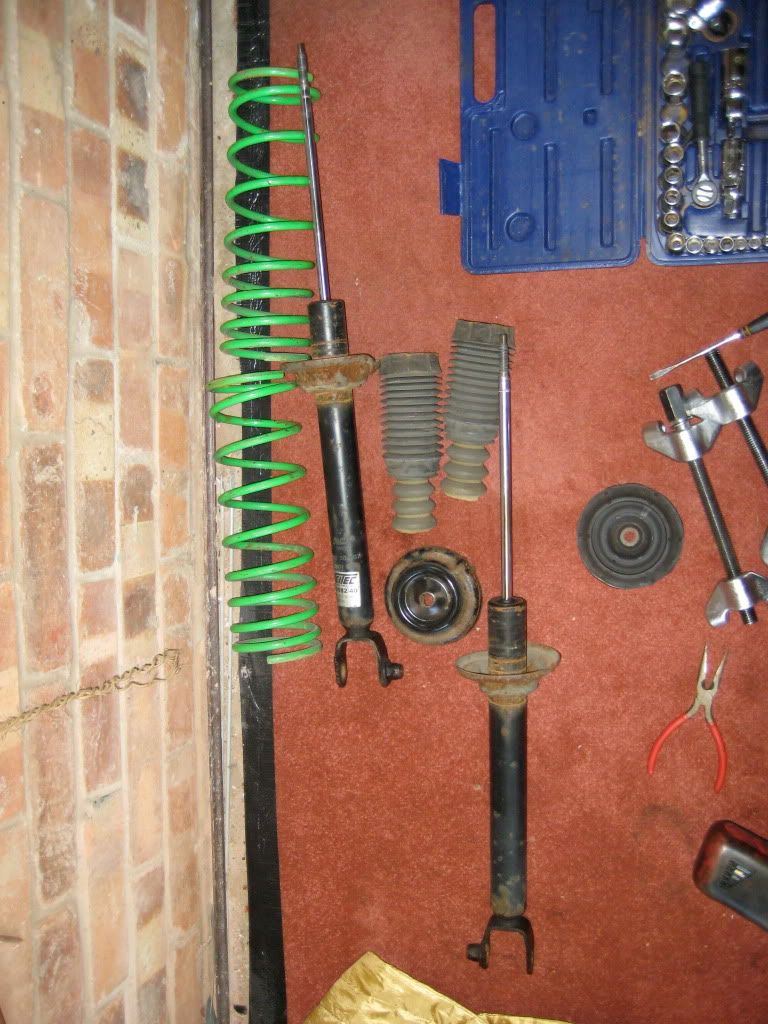
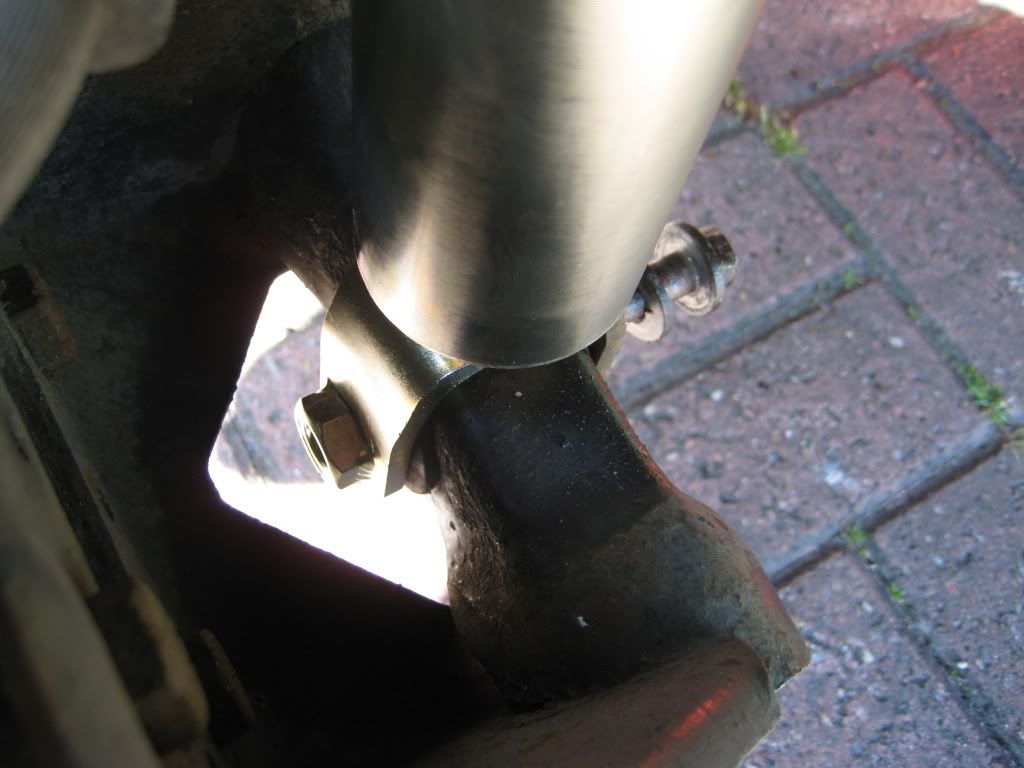
This is what you will be left with.
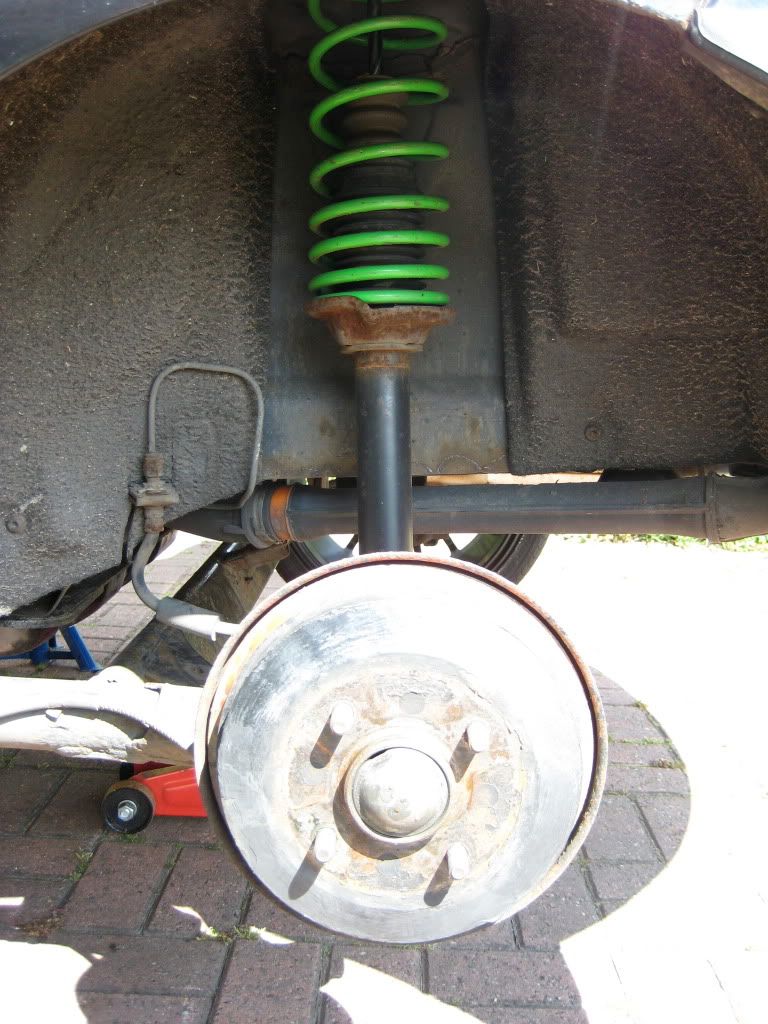
As you can see thats not standard suspension but its very similar. They are just sports dampers and springs. The same will apply to your original suspension.
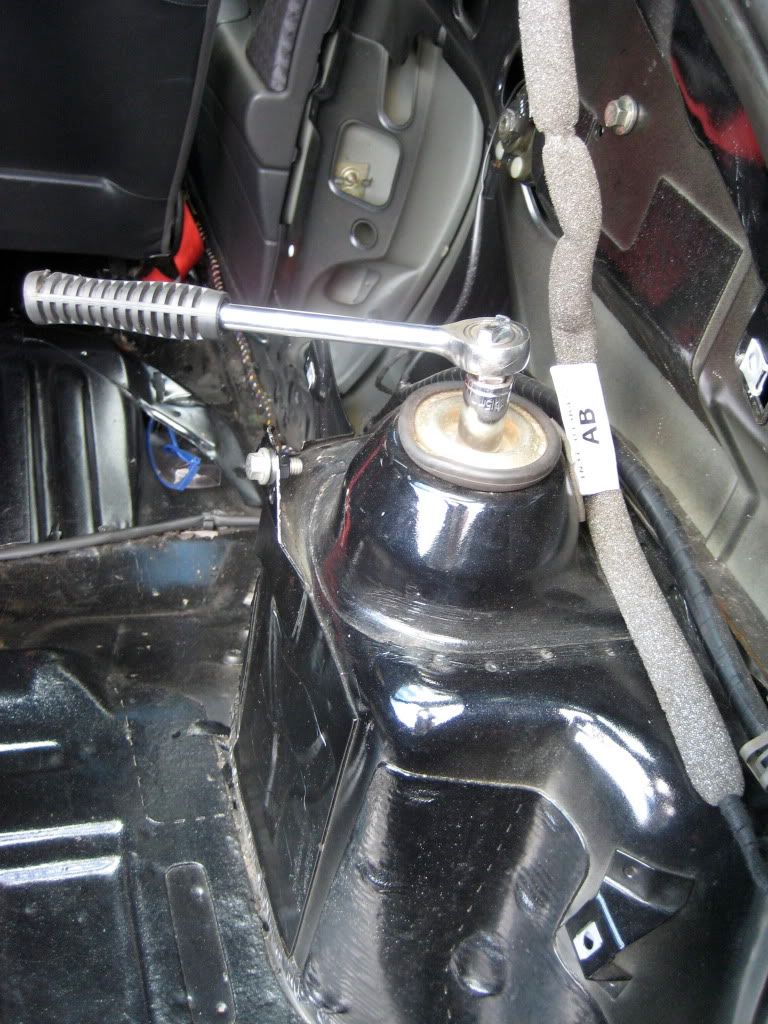
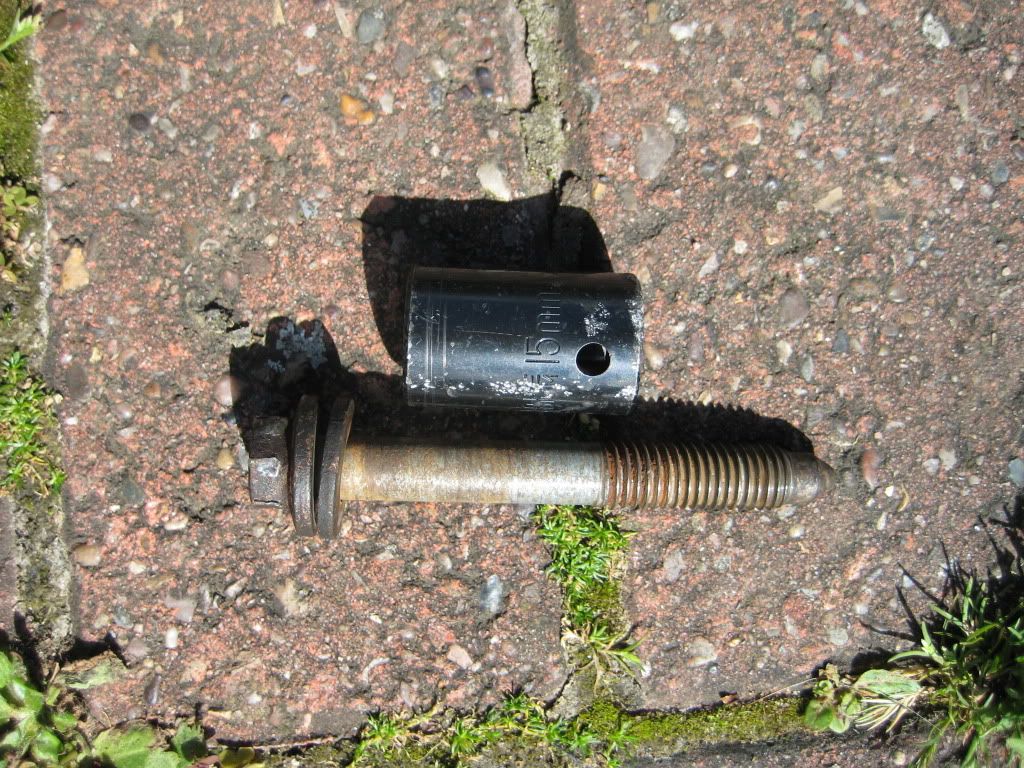
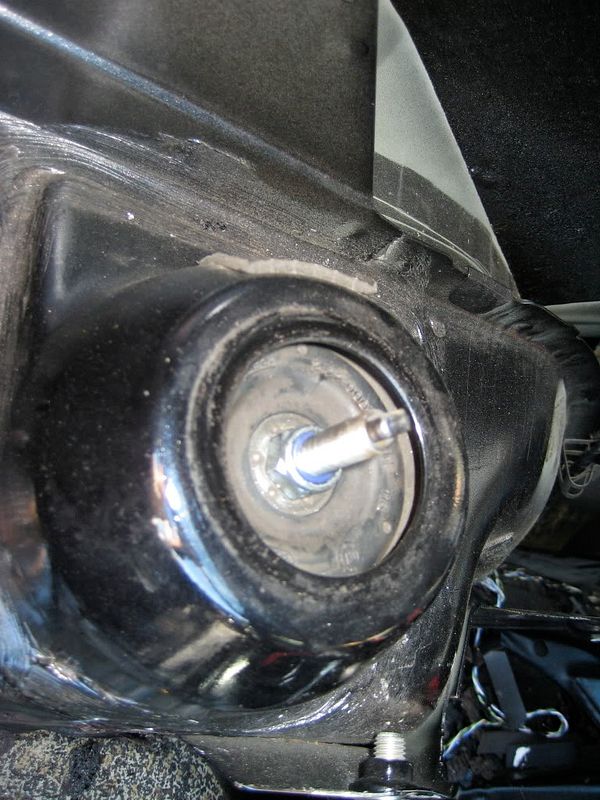
Now open you boot and pull back the boot carpet revealing the strut tops. To my knowledge the later pumas have huge black brackets obstructing any tools from entering and this is where you will need you deep offset spanner. My puma has no interior so its easy for me but I have done this job before and without it I really struggled.
Attach a set of mole grips onto the damper (tight). On the original suspension you may have to cut away at a dust cover to gain access.
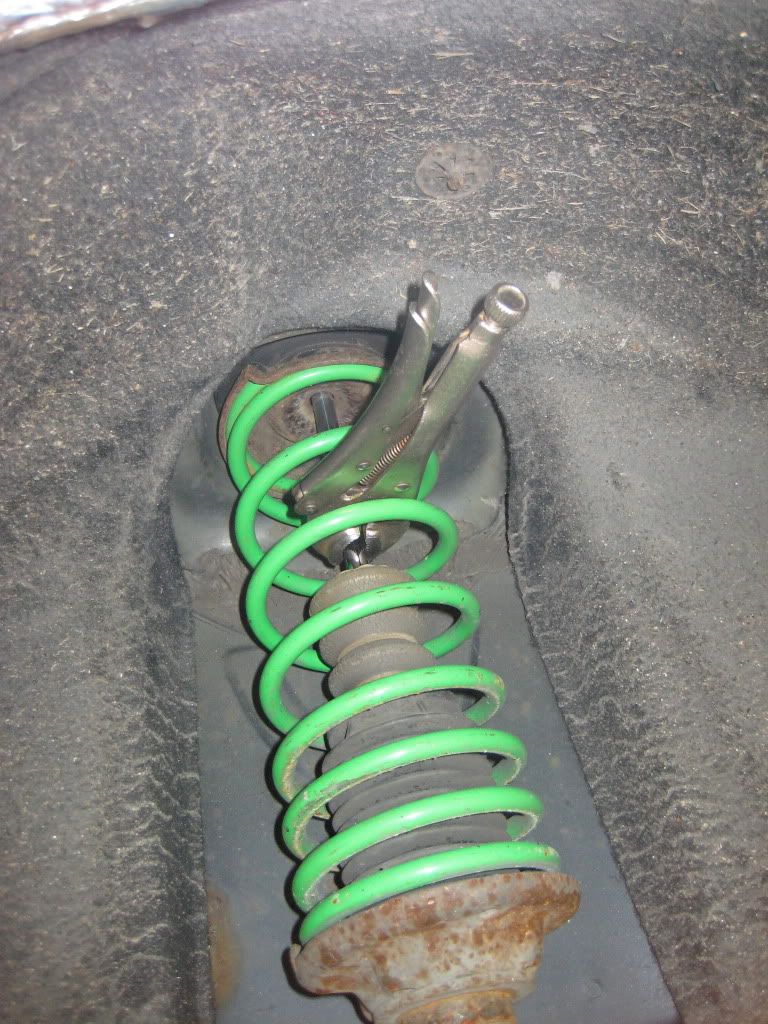
Now start unbolting the top of the suspension. It will move quickly at first before the mole grips clash with the arch lining but then will go stiff. Make sure your damper isn't spinning in the mole grips. If it is then make them a tiny bit tighter until it doesn't.
Once the bolt is removed then repeat on the other side.
Ok time to go under the car.
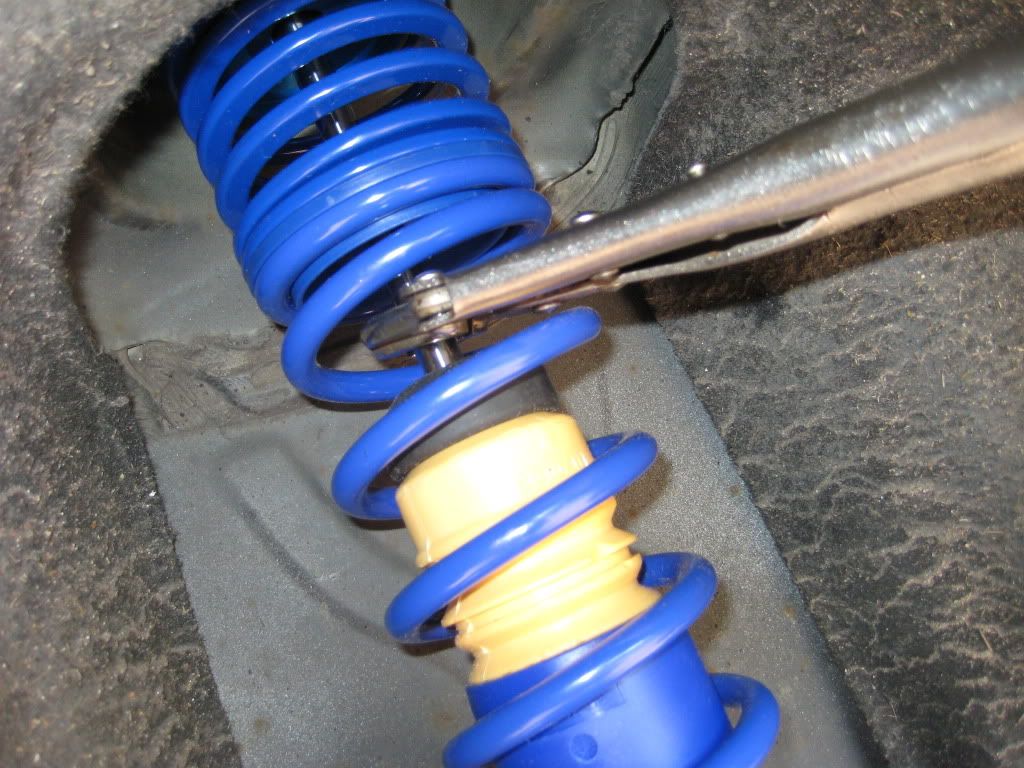
You need to remove the bolt holding the bottom of the damper in.
This may need some WD40 to loosen it up and also an impact wrench would come in handy as on your drive leverage is not easy to achieve.
Once these bolts have been removed from both sides you can lower the axle using the trolley jack. Don't remove the trolley jack or the drums will smash into the floor plus its hard to lift it evenly without it.
The struts should just lift out now.
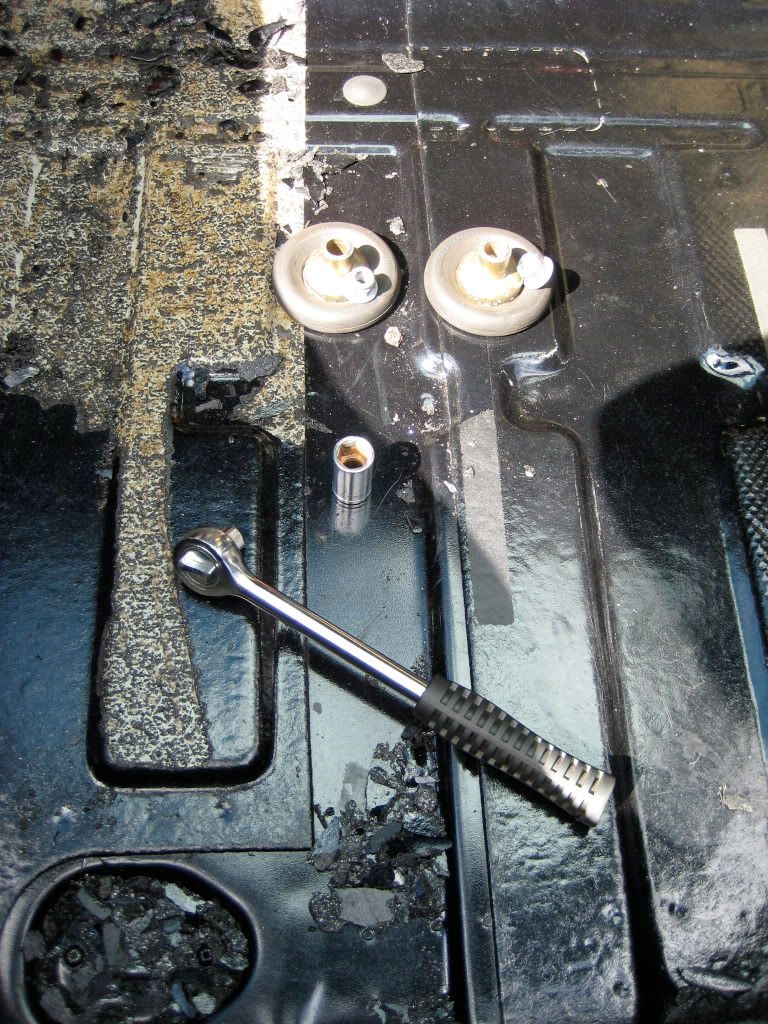
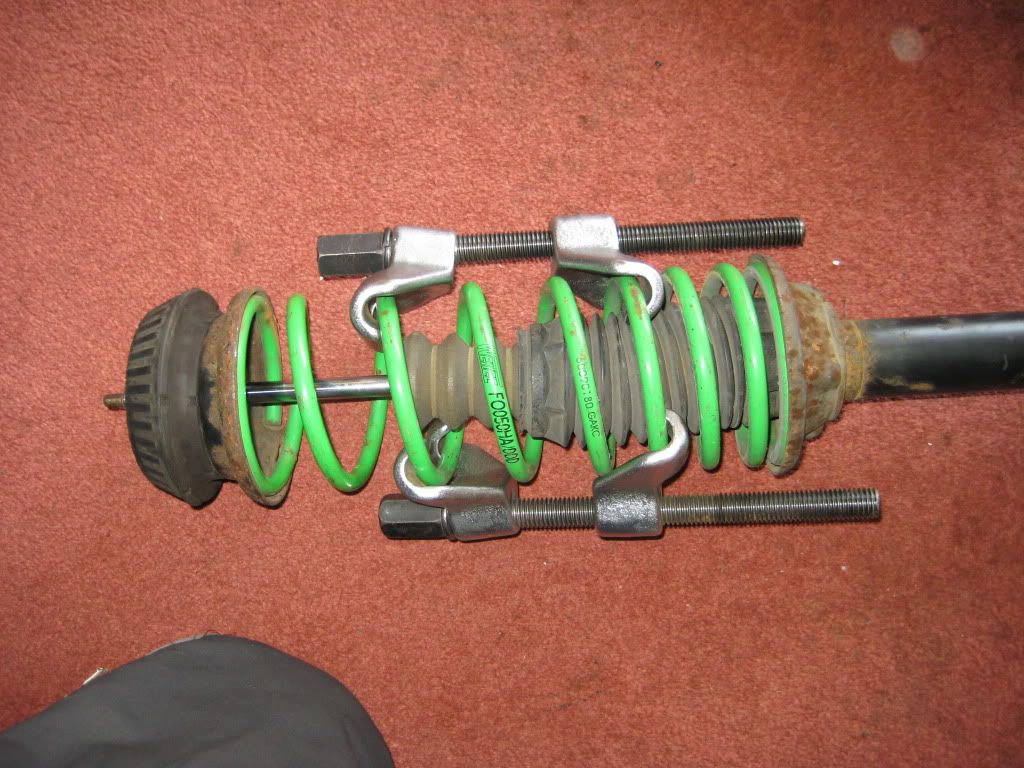
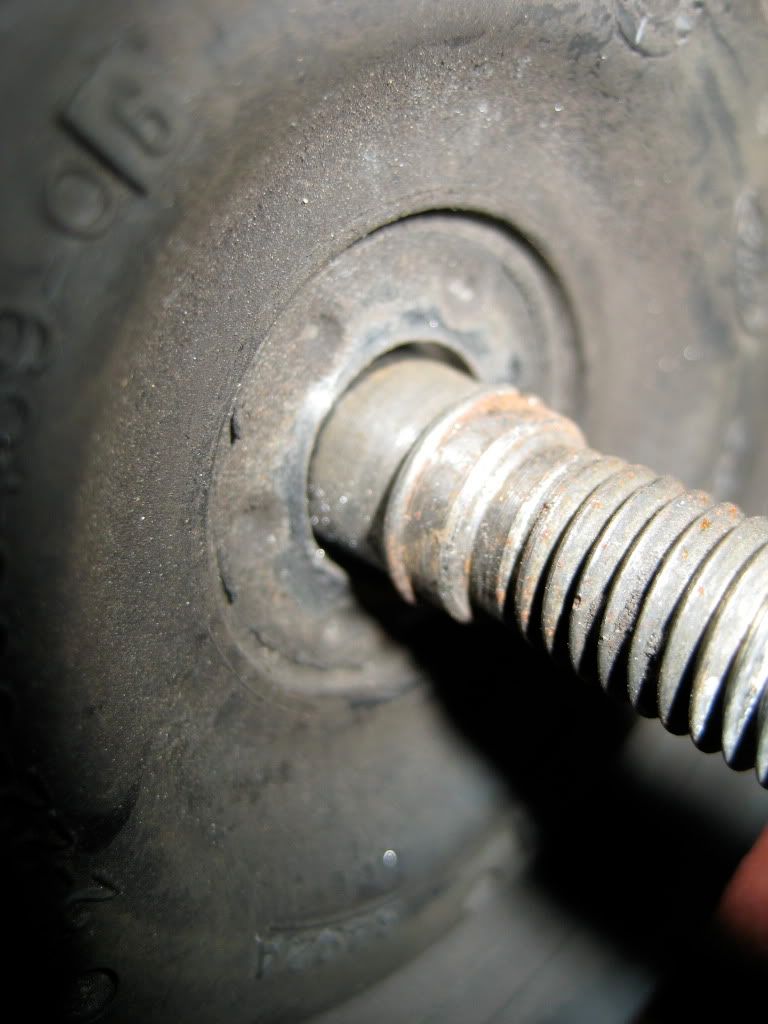
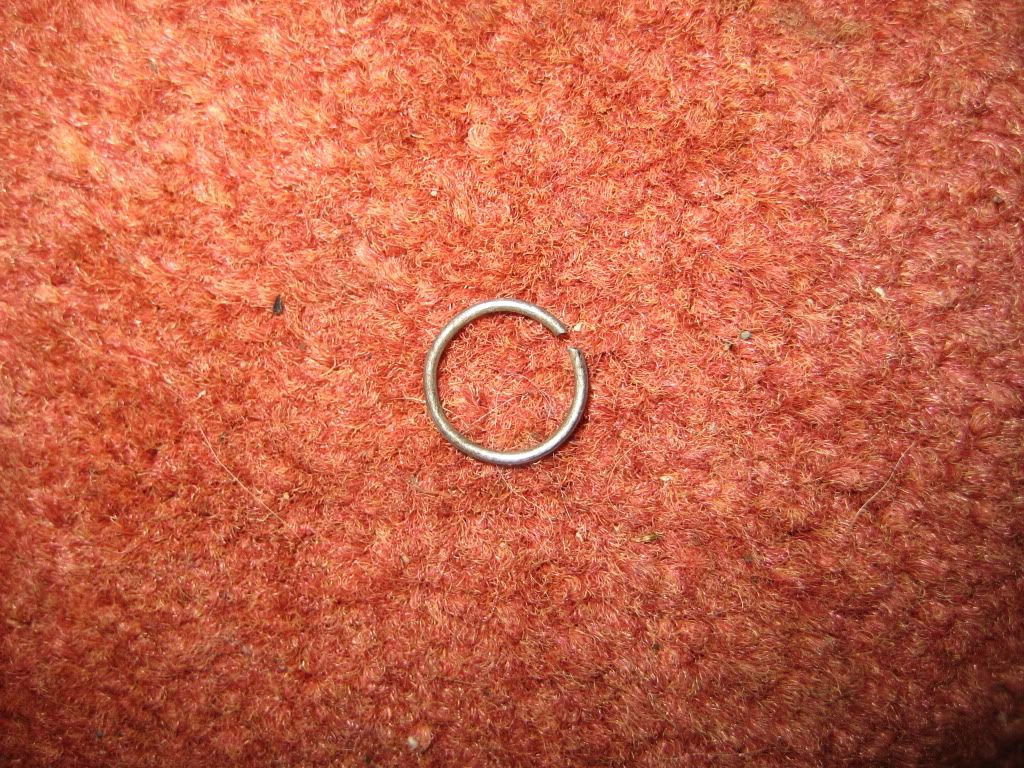
The only thing you need from the rear struts to my memory are the top mounts but sadly they are a pain to get off due to having a metal ring in them that stops them from sliding off.
For this you will need to compress the springs down and release the pressure on the top mount to remove the metal clip.
WARNING
The tension in springs is so much that if you don't handle them with care they could kill you or others. Please take extra care when handling springs and when compressing them down. Make sure the spring compressors are securely on before tightening and also make sure you tighten them evenly in steps.
to:
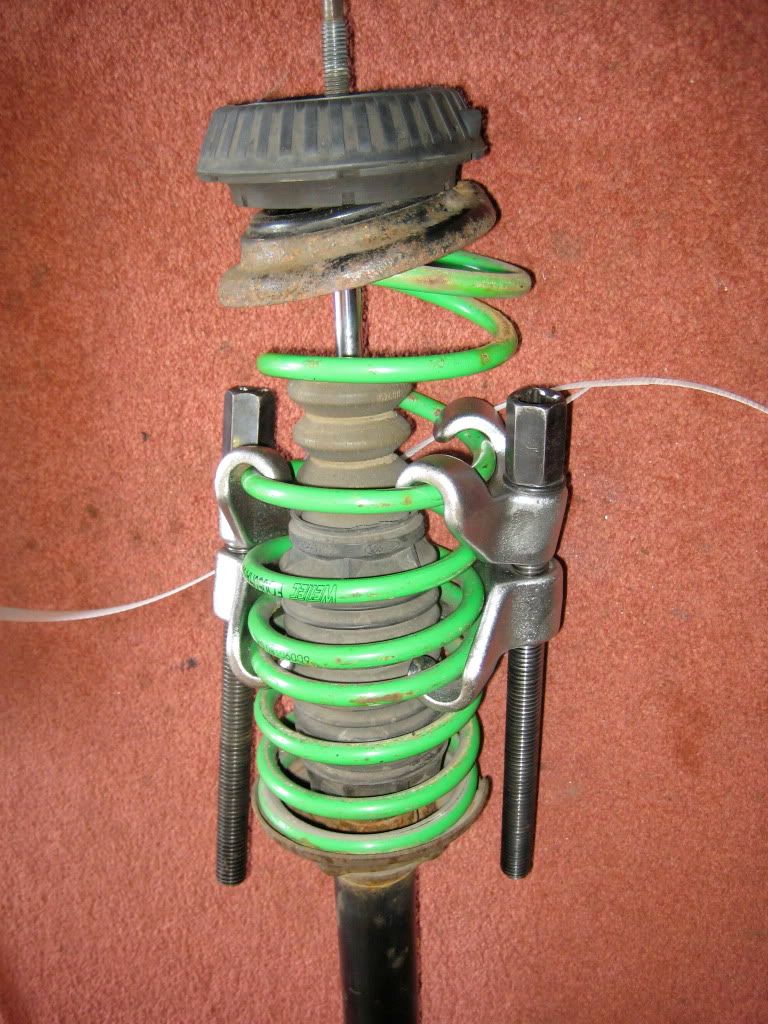
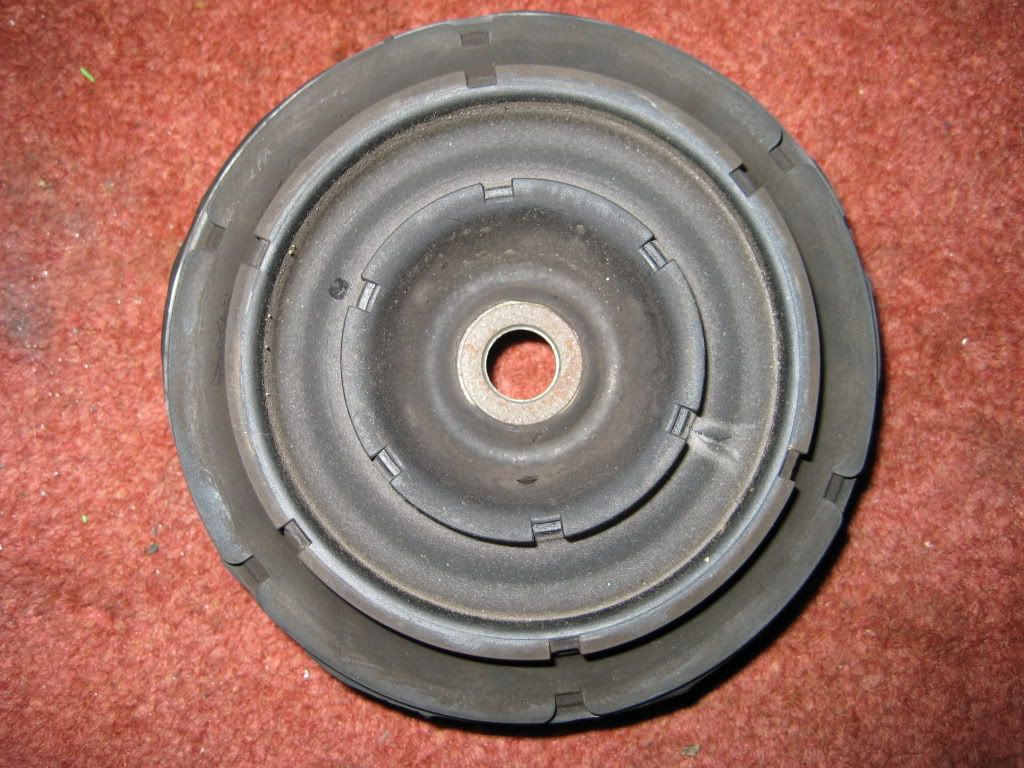
Once the pressure has been released off the rubber top mount you can get a screw driver underneath the top metal ring and remove it.
this will allow you to remove the rubber top mount
So you don't lose it I replace it back onto the strut and start removing the pressure off the springs very slowly and evenly. This will leave you with a dismantled damper and spring setup.
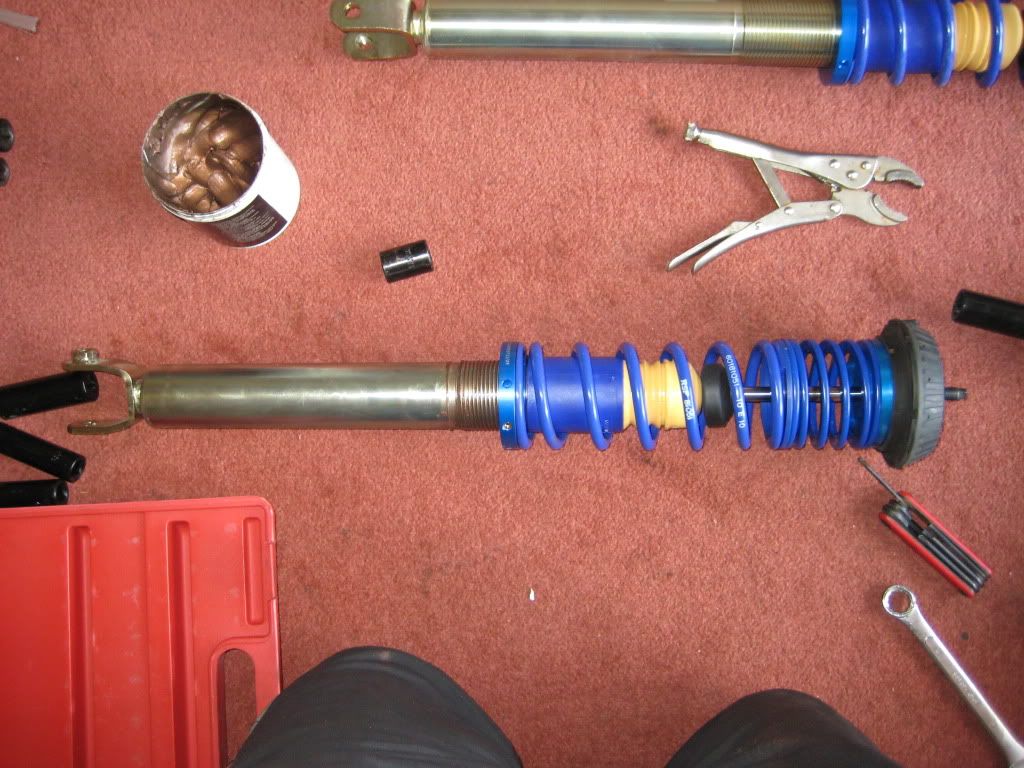
Time to start fitting the new coilovers. I know thats what you have been waiting for but sadly you need to get them dirty before they go on. This will benefit you later once they have rusted a little and don't seize.
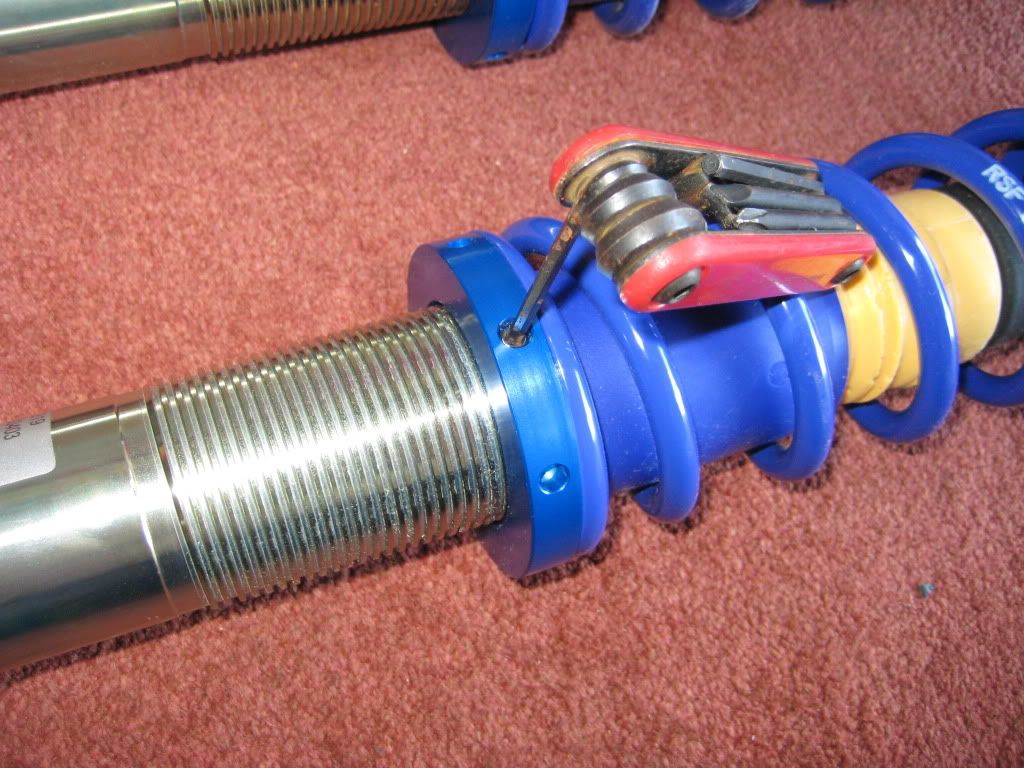
First thing to do is remove the locking pin off the new coilovers.
this will require a small allen key and If I was you I would remove the pin completely and put it somewhere safe.
(if you do lose it then don't worry. Use a Jubilee clip under the adjustable base to stop them winding down under pressure)
The bolt on the top of the strut will not be screwed down due to having a plastic locking piece but if it is don't worry just unscrew it take off the springs. If it is screwed down then you will have to get the mole grips out again and attach them to the damper. Coilovers don't have as much pressure in the springs so they shouldn't be much of a danger but still be careful when releasing the pressure. If you are worried about this then screw the adjustable bottom plate to the very bottom and if the springs still haven't released all their pressure then get a friend to remove the bolt while you push on the top plate of the coilovers to compress them. Then release slowly.
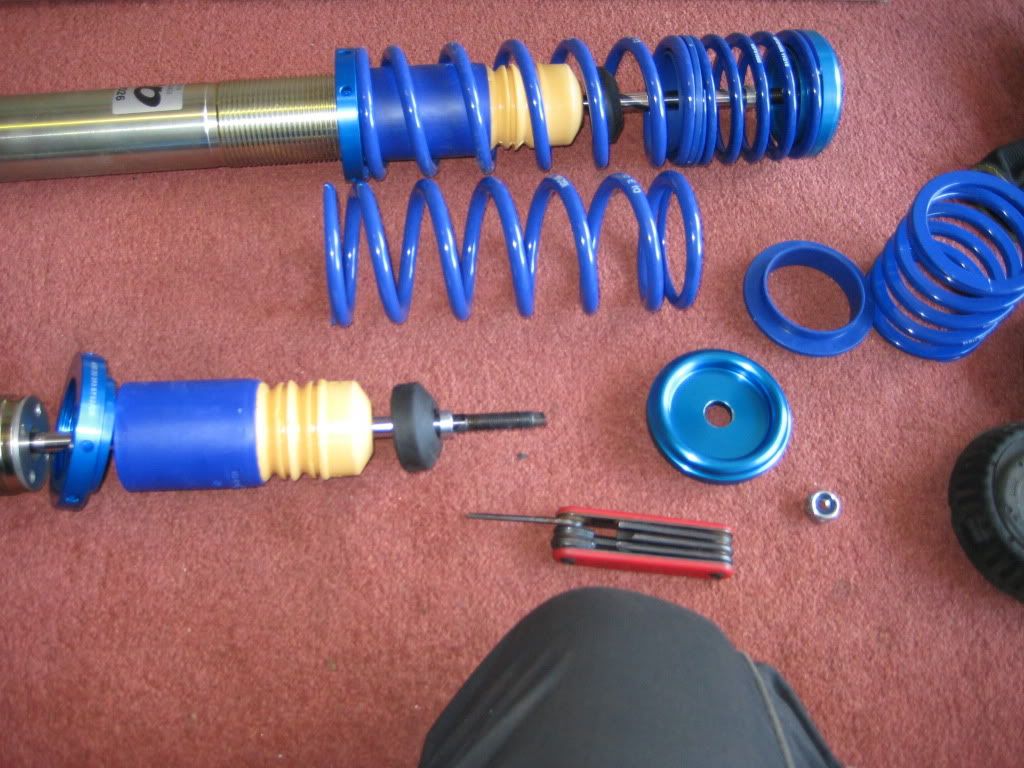
Once the top plate, springs and gasket piece have been remove (you can leave the bump stop on)
wind the adjustable bottom piece to the very top and probably off the top so it comes off the strut.
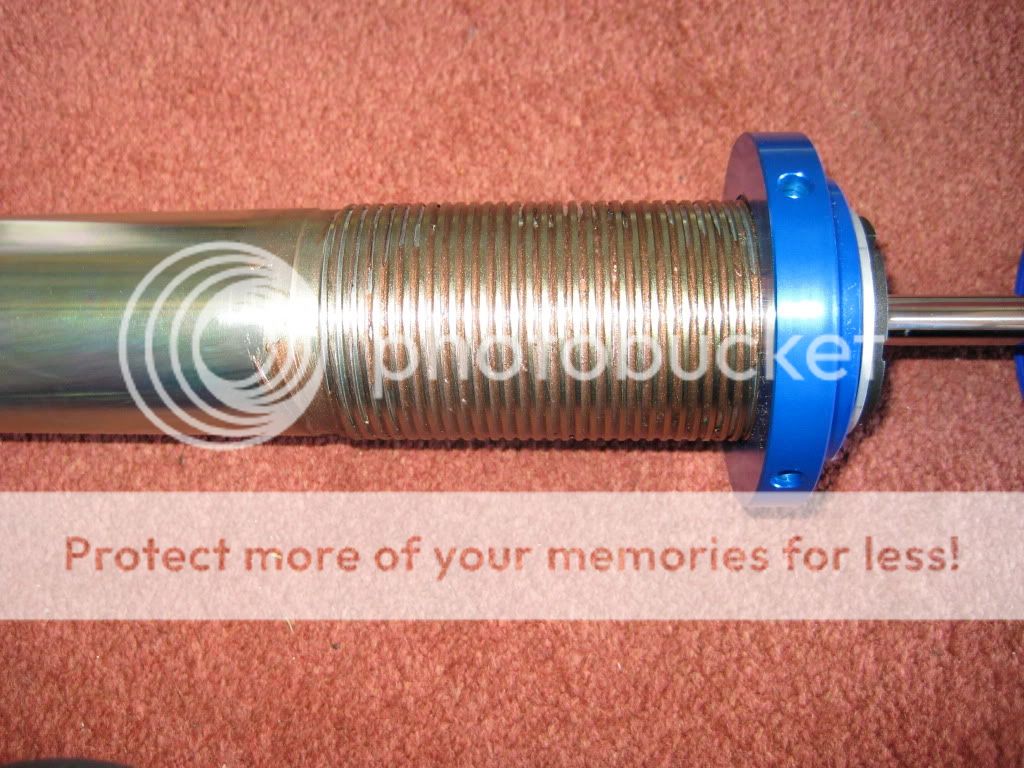
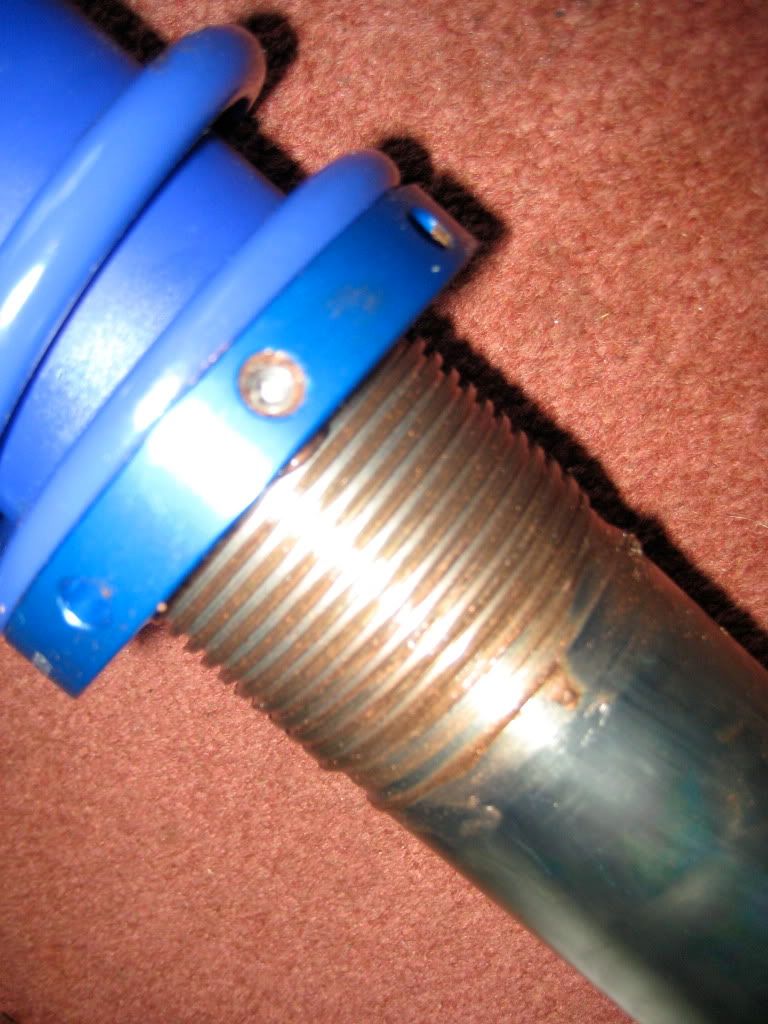
This is where you need the copper grease. Cover the whole of the strut where the adjustable plate is moving on with a healthy amount of copper grease.
Screw the bottom plate all the way to the bottom so that the grease gets in all the cracks and then start assembling the coilover back together.
It goes:
TOP
-Bolt
-Rubber Mount
-Top Plate
-Helper Spring (Smaller spring)
-Gasket
-Main Spring (Big Spring)
-Adjustable Bottom Plate
BOTTOM
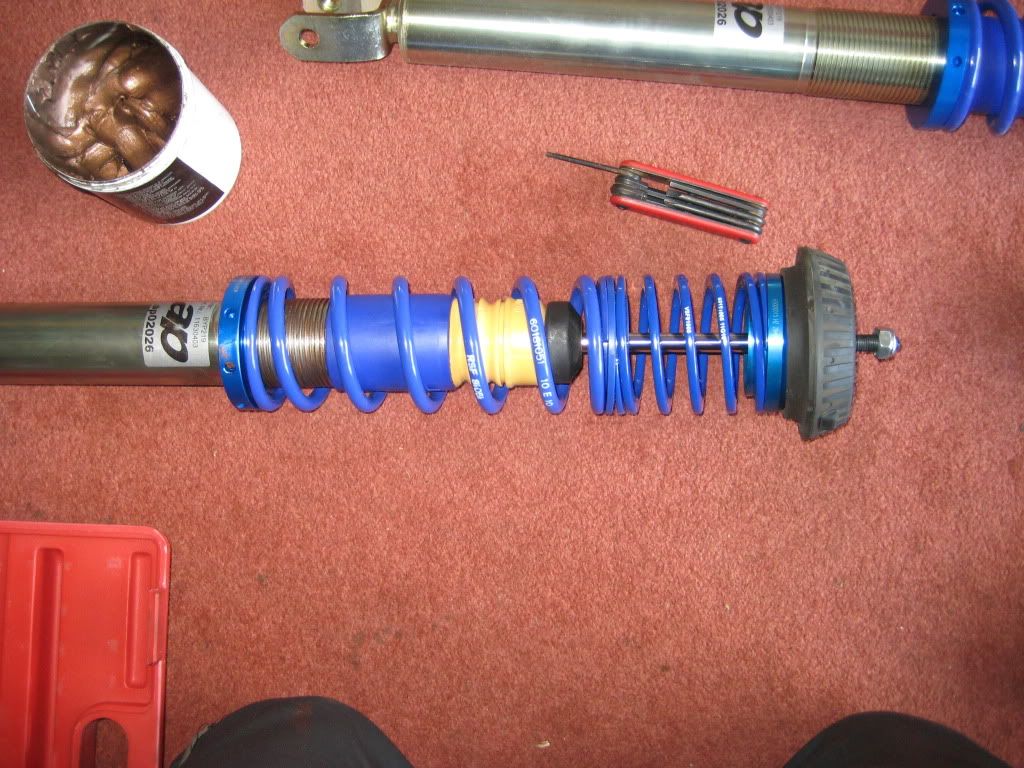
While the bottom plate is at the bottom you need to screw the top bolt down to the bottom of its thread.
Attach the mole grips onto the dampers and screw it down. I struggled to do this without an impact wrench and even my snap on cordless one struggled to do it unless I did it in pulses to stop the damper spinning.
Once this is tightened down you can start adjusting the bottom plate up to the ride height you required. Find out how far the coilovers allow you to drop the ride height and then measure it from the bottom of the struts threaded bit upwards and deduct that off the lowest ride height. I think mine was 40mm raised from the bottom as a base height. Don't forget that they settle in after a few miles of use so if it looks rather high when back on the car don't panic.
Repeat on the other coilover.
Time to fit to the car.
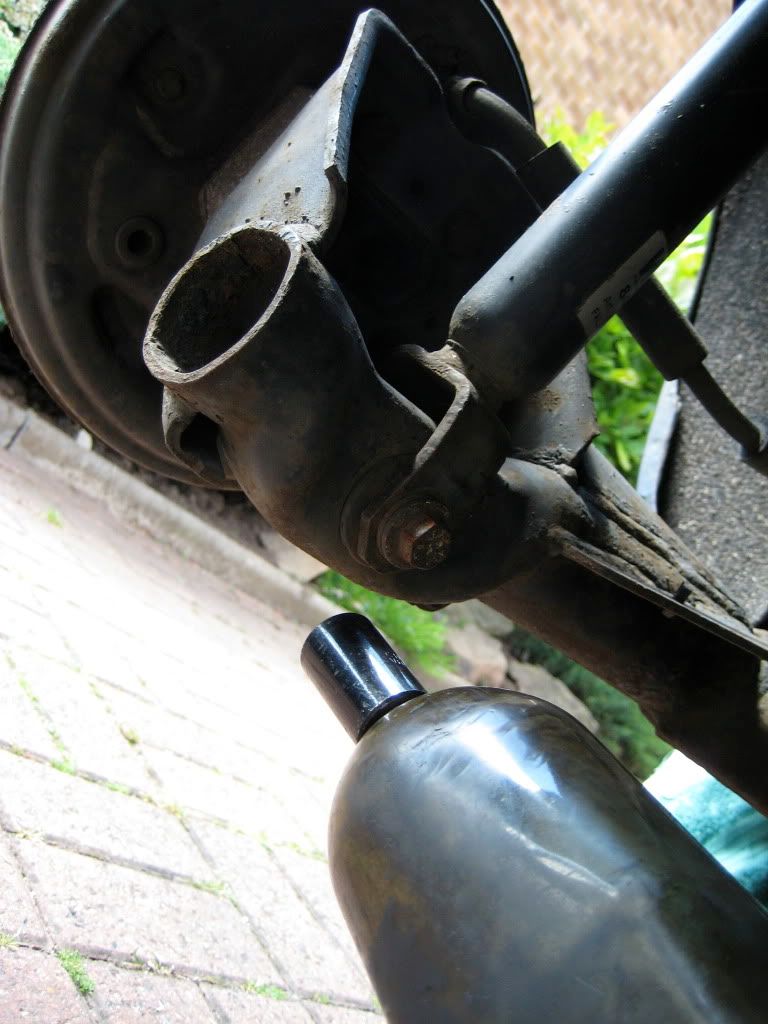
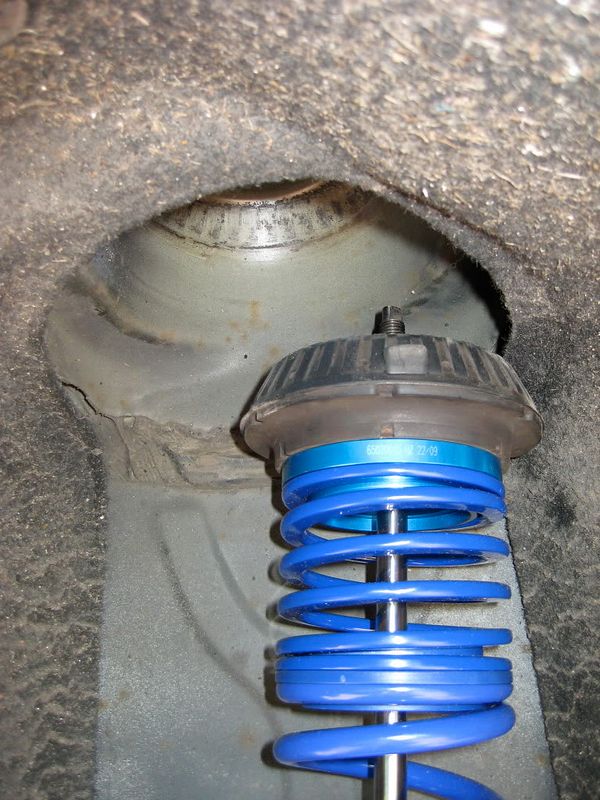
Push the coilover up into the top of the chassis and then lower onto the axle so it lines up with the hole for the bottom bolt.
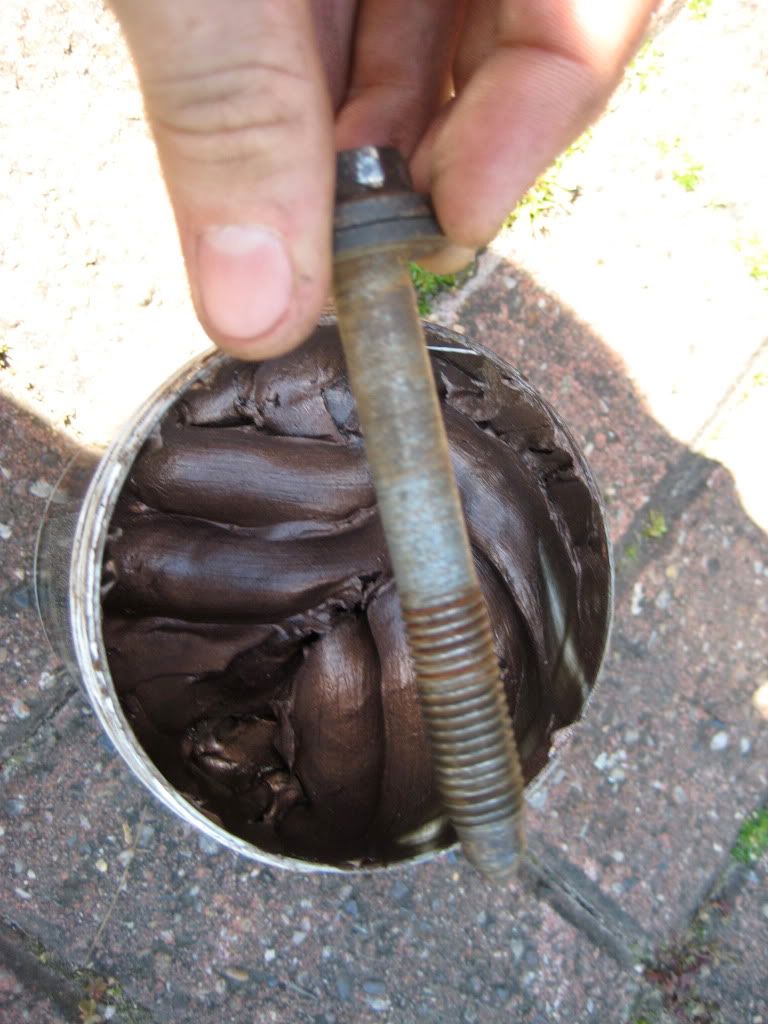
TIP: Copper grease all bolts that are going back onto the car to stop you having to scream at them next time you come to take these bolts off.
This is how they will sit
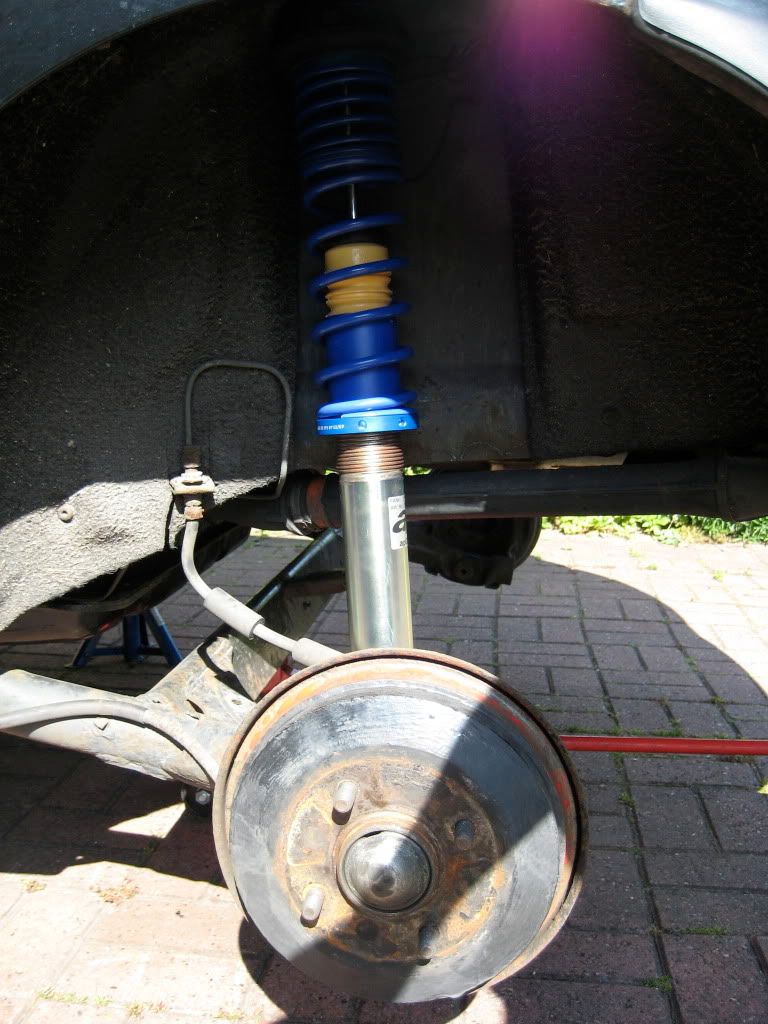
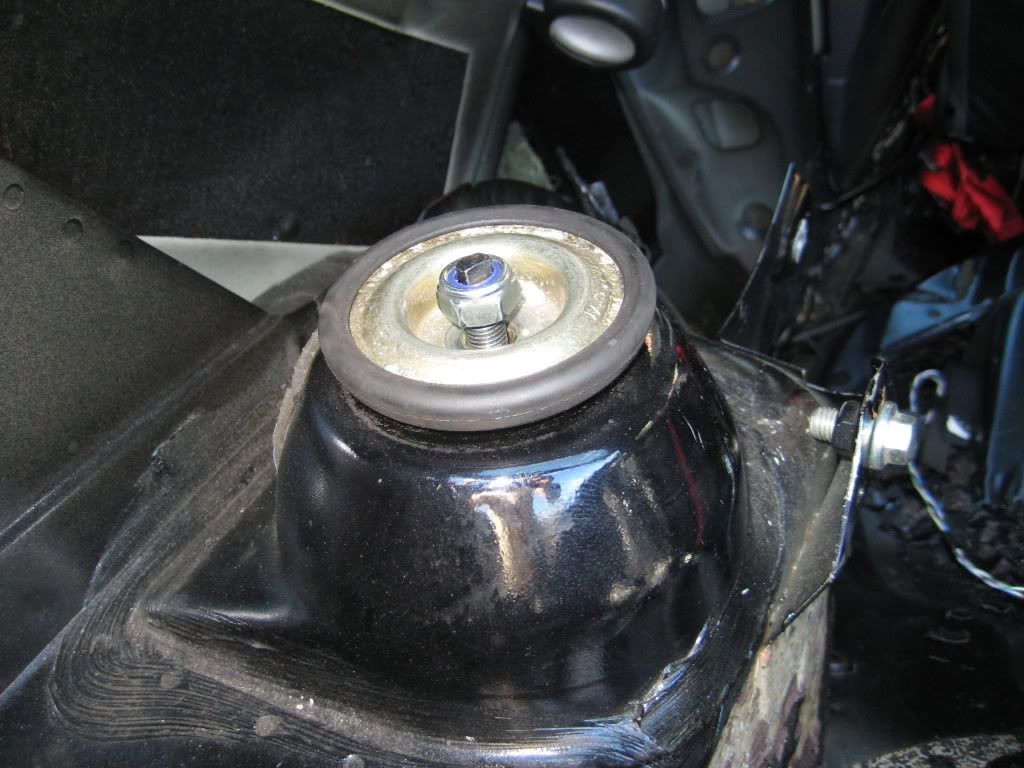
Before you can raise the axle you need to make sure the top rubber mounts lug in the correct position. The lug needs to be facing directly away from the car. If you look up at the chassis mount you will know what I mean. They should just spin around without too much grief but having the strut bolted down helps you.
If you are happy with the struts ride height at this stage then make sure the bottom plate's locking pin location is facing you and then insert the locking pin and tighten. This means you can always adjust the ride height by only having to take the wheel off.

Slowly raise the trolley jack which will lift the axle. Keep checking the coilovers aren't getting snagged and they seat properly
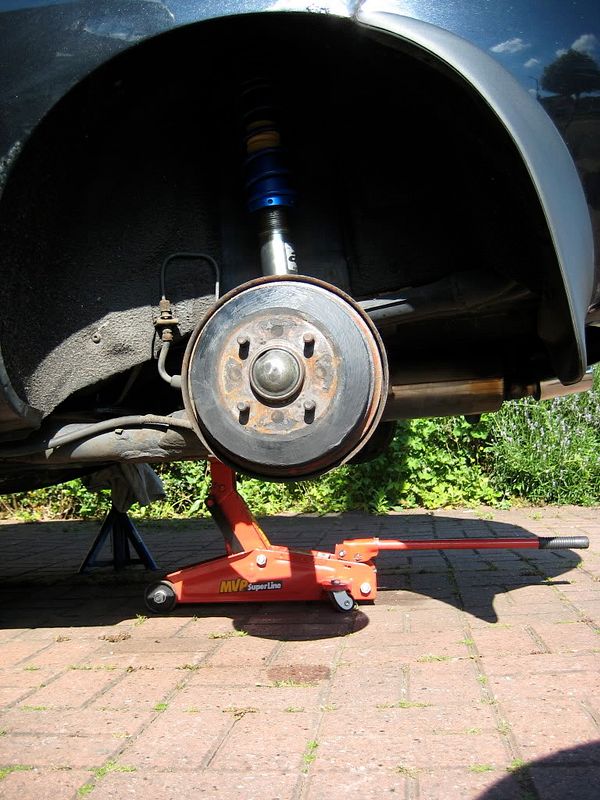
Once they are seated and the trolley jack is securing them up into the chassis you will notice a small problem that I didn't come across when I was using springs and dampers.
With the top bolt on you can't put the top mounts and original top bolts back on to secure the coilovers to the car due to there not being enough thread on the coilover. To get over this I removed the bolt with the coilovers still being secured by the trolley jack using a set of mole grips again before putting the top mount on and securing the bolt down again. Can anyone shed some light on this situation as I am not 100% sure it is correct but it keeps it secure before I can goto the garage and ask them. I think I need some slimline bolts which may of come off the original suspension but seeing as I don't have them any more I didn't have them.
After that all you need to do is refit the interior and put the wheels back on. Jack the car up from the sides of the axle again and remove the axle stands. Then Lower back down.

Thats it for the back. Right I have spent too long writing this so I will do the fronts another day. Enjoy.
I have a feeling I need a slimline bolt for those rear coilovers so dont follow this guide just yet. I am going to fix the problem then re write the last bit.
Disclaimer:
This guide was done myself on my own car. I do not work at a garage and have only learnt how to do this job through experience. It is aimed at enthusiasts willing to do the dirty work themselves and avoid those hideous labour charges. Do not attempt any work upon your car without understanding fully what is involved. Never attempt anything without making sure you know exactly what you are doing and that you have the correct tools. Never endanger yourself or others through in-propper use of tools and the lack of safety equipment. I am stating now that any damage done to yourself or your car while using this guide is 100% your fault and if you dont agree then stop reading now.
On a lighter note I am more than happy to help anybody with questions and offer advice.
Please only comment with constructive criticism or appraisal. I have already stated I am not garage trained.
Recommended Equipment
Allen Keys
Spring Compressors (The 2 hook type are better)
15mm Deep Offset Spanner. ( A must for any puma with interior )
Trolley Jack
Axle Stands
Socket Set
Impact Wrench (Would make things a lot easier)
WD40
Copper Grease (Would advice)
Various Other basic Tools like screwdrivers and pliers may come in handy
Mole Grips (a MUST)
Torque Wrench (if torque settings are known then use one)
Mallet
Assorted Spanners
Step by step guide to changing suspension.
This guide shows you how to fit aftermarket coilovers to your puma.
This guide could also help when fitting springs and dampers and/or repairing original suspension.
I fitted AP Coilovers bought through AP's own website which directs you to Venom Motorsport.
They cost me £422 and I bought the ones with a fork mounted rear end.
97 > 99 Pumas have an axle with fork mountings and the pumas made from then on have an eye mounted rear setup.
Those with eagle eyes will notice my Puma was made in 2000 and but has a older axle. This was due to another suspension issue I covered within my project thread.
Ok lets start.
I will start with the back suspension as its the easiest but before you touch that jack remove the locking wheel nuts off all the wheels. You will thank me later.
Ok so now thats done you can start jacking the car up.
Place the trolley jack at either end of the rear axle (NOT in the middle) and pump it up to its maximum. You need the rear axle to move freely so I use the jacking points on the sills to put my axle stands. I like to use a thick layer of padding ( I use towels ) to protect them a little and help spread the load.
Repeat on the other side of the axle to have the end hanging in the air on axle stands. You may want to wedge something infront of the front wheels to stop them moving but if you are on a flat surface I wouldn't be too worried about this.
TIP Once the rear end is jacked up place the trolley jack under the axle in the middle but without any weight being taken. This will benefit you later.
Undo all the wheel nuts on the back 2 wheels and remove the wheels.
This is what you will be left with.
As you can see thats not standard suspension but its very similar. They are just sports dampers and springs. The same will apply to your original suspension.
Now open you boot and pull back the boot carpet revealing the strut tops. To my knowledge the later pumas have huge black brackets obstructing any tools from entering and this is where you will need you deep offset spanner. My puma has no interior so its easy for me but I have done this job before and without it I really struggled.
Attach a set of mole grips onto the damper (tight). On the original suspension you may have to cut away at a dust cover to gain access.
Now start unbolting the top of the suspension. It will move quickly at first before the mole grips clash with the arch lining but then will go stiff. Make sure your damper isn't spinning in the mole grips. If it is then make them a tiny bit tighter until it doesn't.
Once the bolt is removed then repeat on the other side.
Ok time to go under the car.
You need to remove the bolt holding the bottom of the damper in.
This may need some WD40 to loosen it up and also an impact wrench would come in handy as on your drive leverage is not easy to achieve.
Once these bolts have been removed from both sides you can lower the axle using the trolley jack. Don't remove the trolley jack or the drums will smash into the floor plus its hard to lift it evenly without it.
The struts should just lift out now.
The only thing you need from the rear struts to my memory are the top mounts but sadly they are a pain to get off due to having a metal ring in them that stops them from sliding off.
For this you will need to compress the springs down and release the pressure on the top mount to remove the metal clip.
WARNING
The tension in springs is so much that if you don't handle them with care they could kill you or others. Please take extra care when handling springs and when compressing them down. Make sure the spring compressors are securely on before tightening and also make sure you tighten them evenly in steps.
to:
Once the pressure has been released off the rubber top mount you can get a screw driver underneath the top metal ring and remove it.
this will allow you to remove the rubber top mount
So you don't lose it I replace it back onto the strut and start removing the pressure off the springs very slowly and evenly. This will leave you with a dismantled damper and spring setup.
Time to start fitting the new coilovers. I know thats what you have been waiting for but sadly you need to get them dirty before they go on. This will benefit you later once they have rusted a little and don't seize.
First thing to do is remove the locking pin off the new coilovers.
this will require a small allen key and If I was you I would remove the pin completely and put it somewhere safe.
(if you do lose it then don't worry. Use a Jubilee clip under the adjustable base to stop them winding down under pressure)
The bolt on the top of the strut will not be screwed down due to having a plastic locking piece but if it is don't worry just unscrew it take off the springs. If it is screwed down then you will have to get the mole grips out again and attach them to the damper. Coilovers don't have as much pressure in the springs so they shouldn't be much of a danger but still be careful when releasing the pressure. If you are worried about this then screw the adjustable bottom plate to the very bottom and if the springs still haven't released all their pressure then get a friend to remove the bolt while you push on the top plate of the coilovers to compress them. Then release slowly.
Once the top plate, springs and gasket piece have been remove (you can leave the bump stop on)
wind the adjustable bottom piece to the very top and probably off the top so it comes off the strut.
This is where you need the copper grease. Cover the whole of the strut where the adjustable plate is moving on with a healthy amount of copper grease.
Screw the bottom plate all the way to the bottom so that the grease gets in all the cracks and then start assembling the coilover back together.
It goes:
TOP
-Bolt
-Rubber Mount
-Top Plate
-Helper Spring (Smaller spring)
-Gasket
-Main Spring (Big Spring)
-Adjustable Bottom Plate
BOTTOM
While the bottom plate is at the bottom you need to screw the top bolt down to the bottom of its thread.
Attach the mole grips onto the dampers and screw it down. I struggled to do this without an impact wrench and even my snap on cordless one struggled to do it unless I did it in pulses to stop the damper spinning.
Once this is tightened down you can start adjusting the bottom plate up to the ride height you required. Find out how far the coilovers allow you to drop the ride height and then measure it from the bottom of the struts threaded bit upwards and deduct that off the lowest ride height. I think mine was 40mm raised from the bottom as a base height. Don't forget that they settle in after a few miles of use so if it looks rather high when back on the car don't panic.
Repeat on the other coilover.
Time to fit to the car.
Push the coilover up into the top of the chassis and then lower onto the axle so it lines up with the hole for the bottom bolt.
TIP: Copper grease all bolts that are going back onto the car to stop you having to scream at them next time you come to take these bolts off.
This is how they will sit
Before you can raise the axle you need to make sure the top rubber mounts lug in the correct position. The lug needs to be facing directly away from the car. If you look up at the chassis mount you will know what I mean. They should just spin around without too much grief but having the strut bolted down helps you.
If you are happy with the struts ride height at this stage then make sure the bottom plate's locking pin location is facing you and then insert the locking pin and tighten. This means you can always adjust the ride height by only having to take the wheel off.
Slowly raise the trolley jack which will lift the axle. Keep checking the coilovers aren't getting snagged and they seat properly
Once they are seated and the trolley jack is securing them up into the chassis you will notice a small problem that I didn't come across when I was using springs and dampers.
With the top bolt on you can't put the top mounts and original top bolts back on to secure the coilovers to the car due to there not being enough thread on the coilover. To get over this I removed the bolt with the coilovers still being secured by the trolley jack using a set of mole grips again before putting the top mount on and securing the bolt down again. Can anyone shed some light on this situation as I am not 100% sure it is correct but it keeps it secure before I can goto the garage and ask them. I think I need some slimline bolts which may of come off the original suspension but seeing as I don't have them any more I didn't have them.
After that all you need to do is refit the interior and put the wheels back on. Jack the car up from the sides of the axle again and remove the axle stands. Then Lower back down.
Thats it for the back. Right I have spent too long writing this so I will do the fronts another day. Enjoy.
I have a feeling I need a slimline bolt for those rear coilovers so dont follow this guide just yet. I am going to fix the problem then re write the last bit.
")