Restoration of FRP 477

ProjectPuma

Help Support ProjectPuma:

This site may earn a commission from merchant affiliate links, including eBay, Amazon, and others.
Oh dear, I really shouldn't have started poking..... Had another free hour today whilst the little one was sleeping so out with angle grinder to open up the sill area. Warning, graphical content below!!!
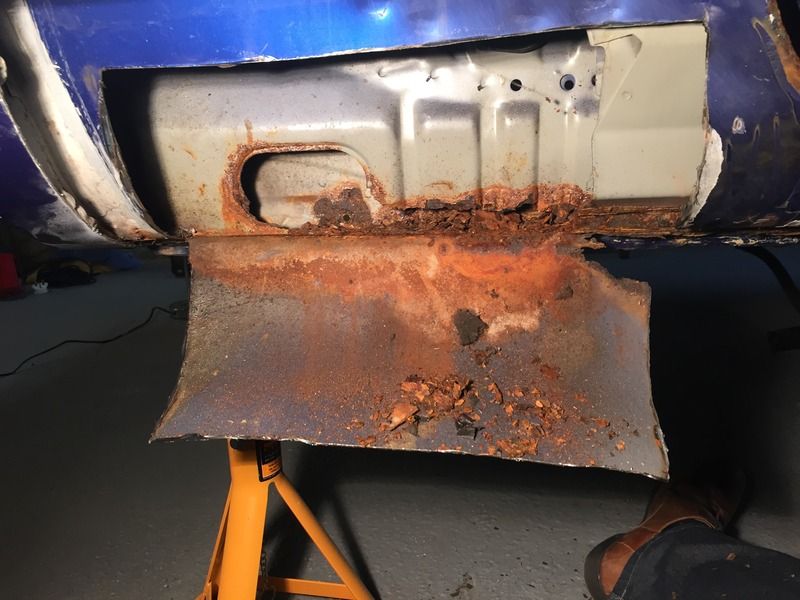


And close up....


So, I'm at a crossroads. Sell the child, sell the fiancé and cancel the wedding or dig deep. Sadly I doubt I'd get much for the fiancé and to be fair, she puts up with my car obsession and the little one is nearly two years old and already car mad so looks like it's option 3. Now just to find the money....


Barry kindly offered to help with the inner sill, but think that's a favour too far when there will be all the other bits the sill is attached to that need fixing too. Plus I don't want Andrew turning up wondering why his Anglia isn't finished.....
 
Hi James
Still not a problem if you do the hard work and I just have to turn up and weld as I can do it at night and not pee off your neighbours. We'll have to meet up again and get a plan of attack.
Barry
 
Jeeze!! Those FRPs like to rust don't they?!

Regardless, the value of them makes it totally viable to fix up. A sound investment and a great car XAF - just keep reminding yourself of that and keep going!
 
Its been nice to catch up on this one and good to see things are progressing nicely :thumbs:
 
quest63 said:
[post]349634[/post] Its been nice to catch up on this one and good to see things are progressing nicely :thumbs:

Cheers Gary! More updates soon...
 
Mines SORNED indefinately and a nasty old Passat estates the daily hog for now, but thankfully both new sills will be available
when I'm in a position to do some renovations in the future.
 
Today was an exciting day, with the Project Bankrupt back from the blasters and dropped off at the bodyshop. I hadn’t seen the car since the blasting was finished so was a little nervous as to what would be left and what the finish of the blasting, priming and undersealing would leave. So here she is, in all her glory:


The blasters had said they were sorry they hadn’t cleaned it, but to be honest I was really surprised how clean it was inside and out. As an added bonus, they’d done more than just referb the tank, they’d painted it too which was amazing:


The finish on the floors and arches was really good, and they took a few pictures during to show the bare metal finish. This is the arch blasted:


Then primed, seam sealed and stonechipped ready for me to decide what colour to do the underside and arches. It’s a toss up between the original black in the arches and grey for the boot floor, body colour for the main floor or keep the inner arches body colour at the back and black around the ‘tub’. Decisions, decisions. Anyway, here is a random shot of the finish in the arch.


The boot floor, body seams and main floor was done exactly the same, and whilst it’s not smooth like factory on the boot section, at least it’s protected properly now and the rust can’t come back. Not least it was quite scarred from the rust before:


Sounds good so far doesn’t it? Errrr, well remember that inner sill? Well it really is quite rotten, as it the bottom of the B post and floor flange:


So the little beast is now sitting at the bodyshop where it will be for the next four weeks or so having all the rot fixed, the sills and quarter bottoms repaired (using a new sill from Ex Pressed Steel Panels) and then a full respray. After that it’s then a mad rush to re-assemble ready in time for my wedding on 25th June. Will it be done? It better be as the car is on the top of the cake!!

In the meantime, the rear beam is off for blasting and powdercoating now, so once it’s back I can rebuild it all and put the newly refurbed brakes from Bigg Red on, 30mm axle spacers, new bushes etc.
 
Hi James, outstanding, wish I had the cash to get mine done, keep up the positivity , it'll be the best one on the road when it's all done.
 
Wild E. Coyote said:
[post]351487[/post] Really impressive! Excellent effort!

Thanks Sinisa

rnnicol said:
[post]351488[/post] Hi James, outstanding, wish I had the cash to get mine done, keep up the positivity , it'll be the best one on the road when it's all done.

Cheers Richard. As all best made plans go, it's going to be over budget at the end, and money I'd rather not be spending with the wedding coming up too, but when you're in this deep you can't do anything but do a proper job. Plus I promised the lady I bought it off a picture of it with ribbons on it on the wedding day!!
 
XAF said:
After that it’s then a mad rush to re-assemble ready in time for my wedding on 25th June. Will it be done? It better be as the car is on the top of the cake!!

Bloody 'ell. How big is your cake ? :lol: :lol:
 
Looking great James! I've gone through the same process of doing the underside (except for the shotblasting) and two years later it still looks mint. Really worth the investment. As Richard said, your Puma will be one of the best on the road once it's finished :)
 
Loving this project - gives a good insight into what's needed to keep an FRP too. Really glad to see you're doing this properly as well!
 
Great job. Love the effort your going to to get this right. It will be well worth it when its been resprayed :eek:k:
 
I agree , you get to a point when the only option is to go forward, even though the cost out ways the value. But we do it for the love and the challenge to make our cars the best we can. It ll look great on your wedding day, and you'll have a story to tell.
 
Great car and progress, the underside and that fuel tank looks mint.
Good luck with the finishing!
 

Latest posts

Back
Top