My puma cossie - few bits and bobs. (Very picture heavy!)

ProjectPuma

Help Support ProjectPuma:

This site may earn a commission from merchant affiliate links, including eBay, Amazon, and others.
Bit of an update.

Wanted to replace my ancient sierra engine management loom for a while now so decided to get on with designing my loom. After some advice on here i have a loom design ive settled on.

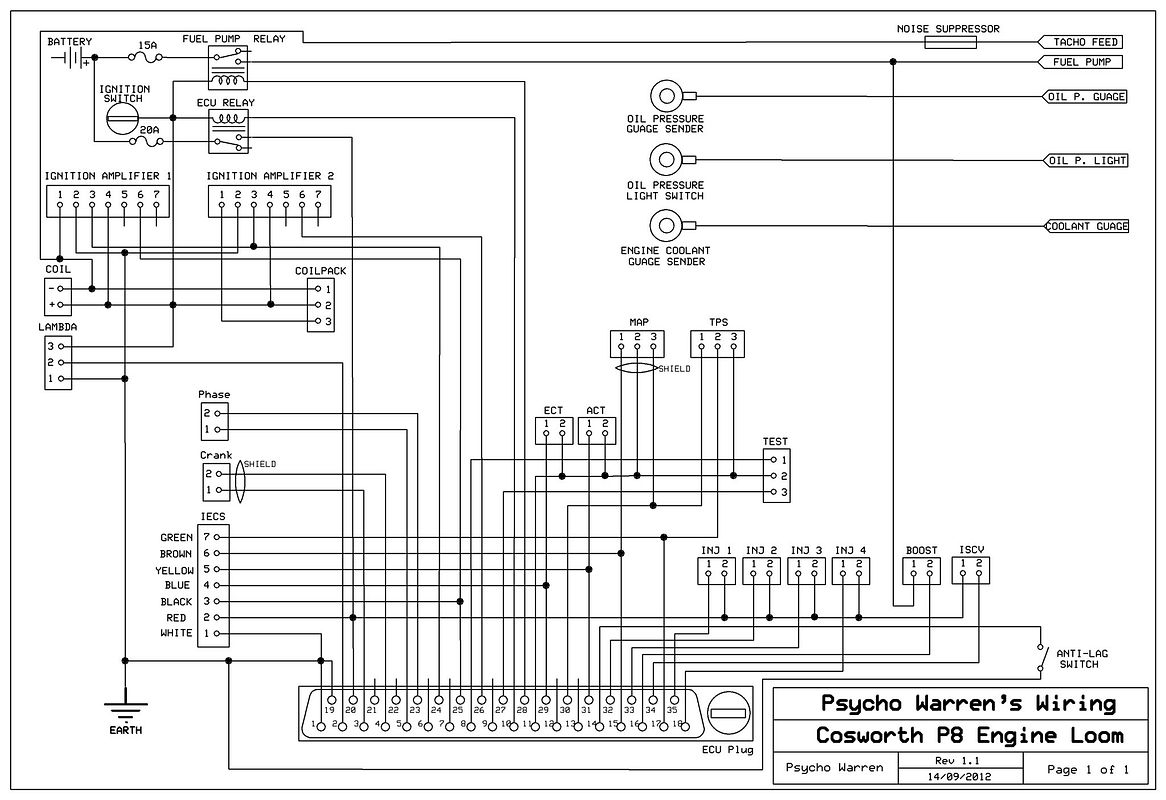
This is the basic wiring diagram:
cosworthloom1.jpg
[/QUOTE]

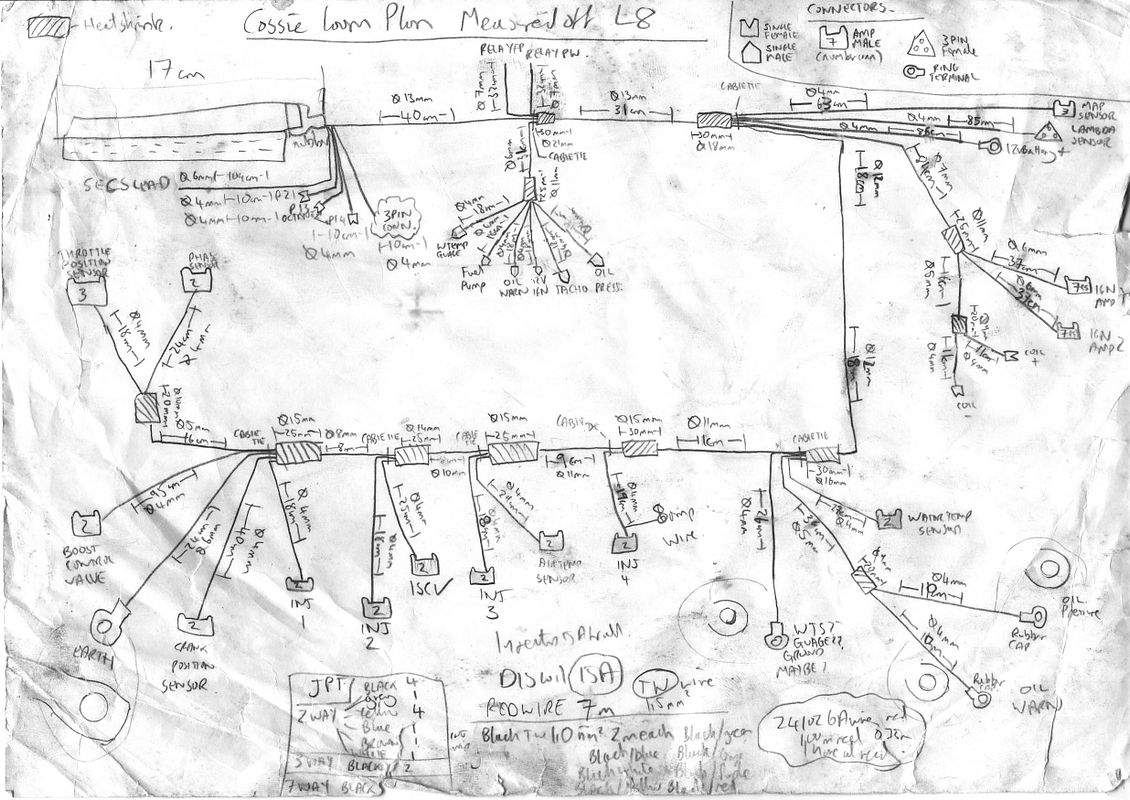
I also measured a loom up and had to design my loom plan and adjust all the distances and branch lengths for my car. here is the sketch!

IMAGE0001.jpg


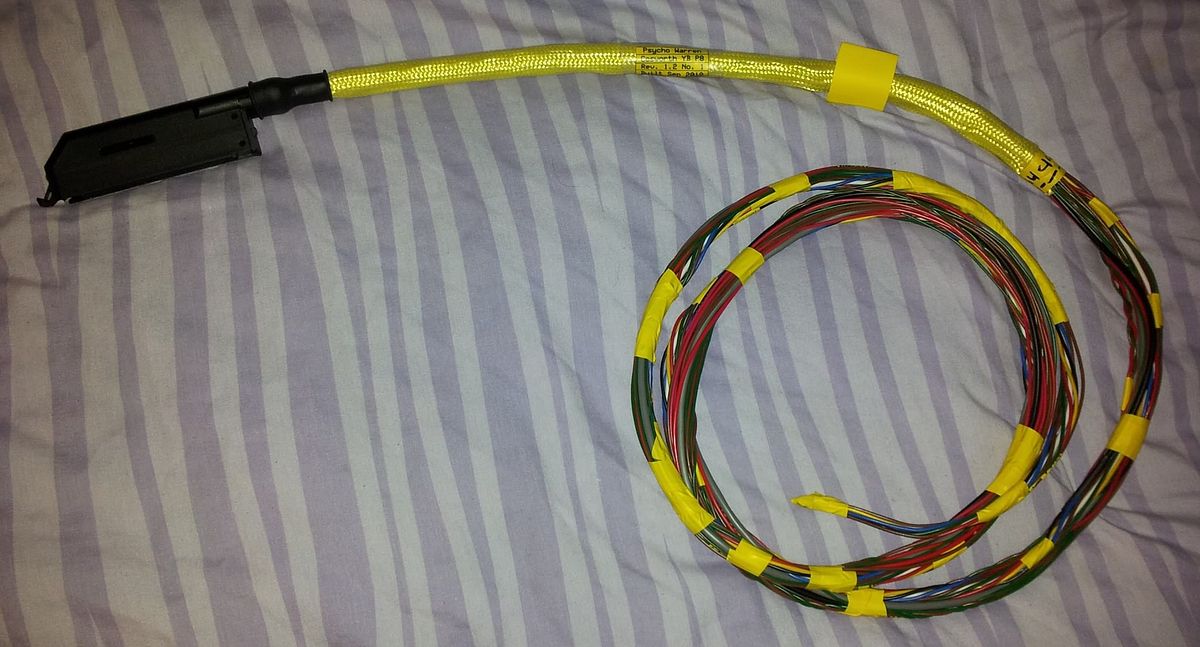
Purchased all the connectors, wiring etc and then made a start on the loom. Done everything that goes in or near the ECU plug. In essence ive done the easy bit :cry:

20120924_063748_zps17035a47.jpg


Then carried on down the loom adding the braid and heat shrink as i come to each break out.

20121006_064814.jpg

20121009_062405.jpg


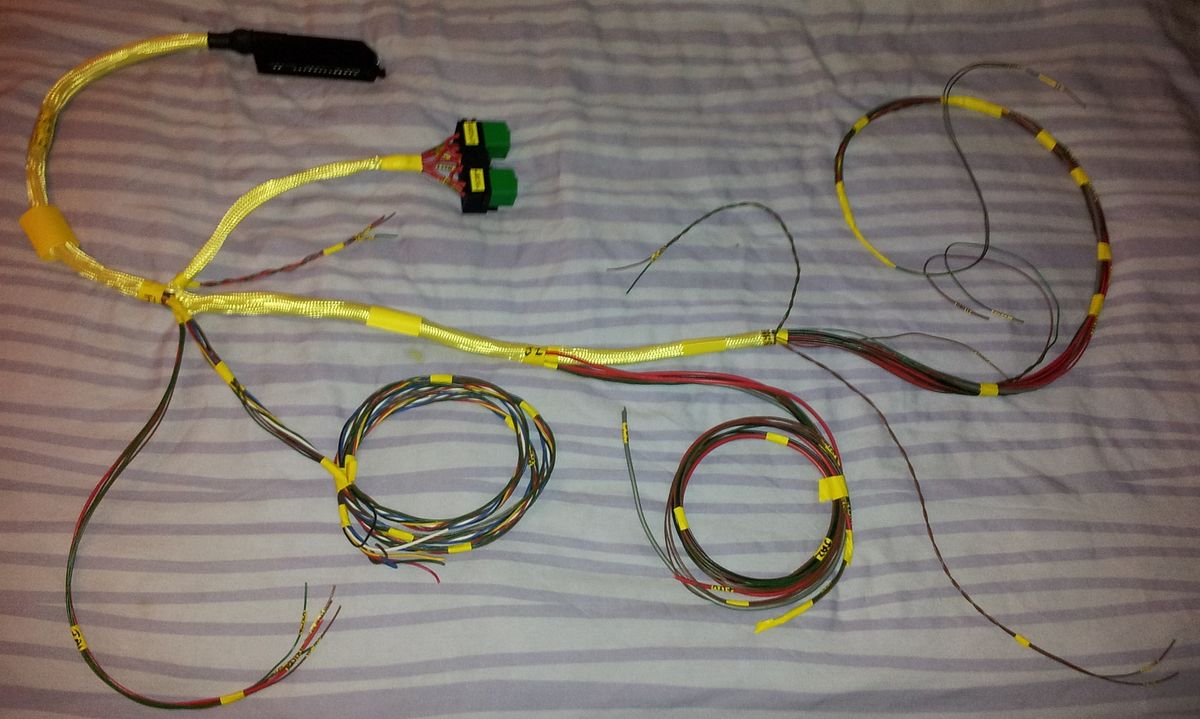
I definitely prefer the kevlar braiding to the plastic braiding. More flexible and seems to be stronger gripped at the ends when its secured.

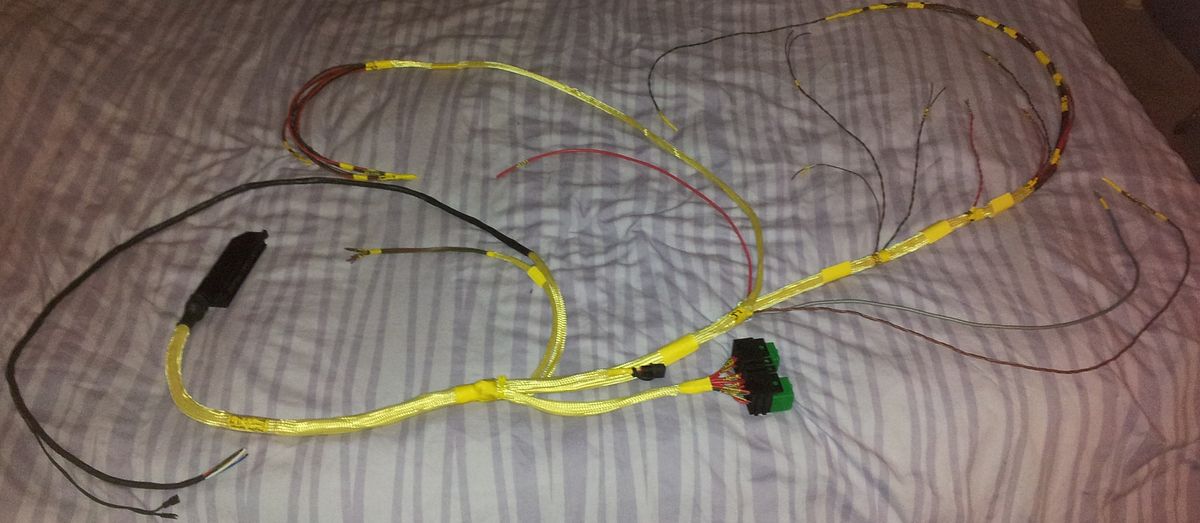
With all the braiding now at the end of the main loom, I started back at the beginning now on all the breakouts.

Completed my first breakout:
20121010_043211.jpg


its nice to finally start putting on connectors meaning bits of the loom look actually finished.

20121025_050935.jpg

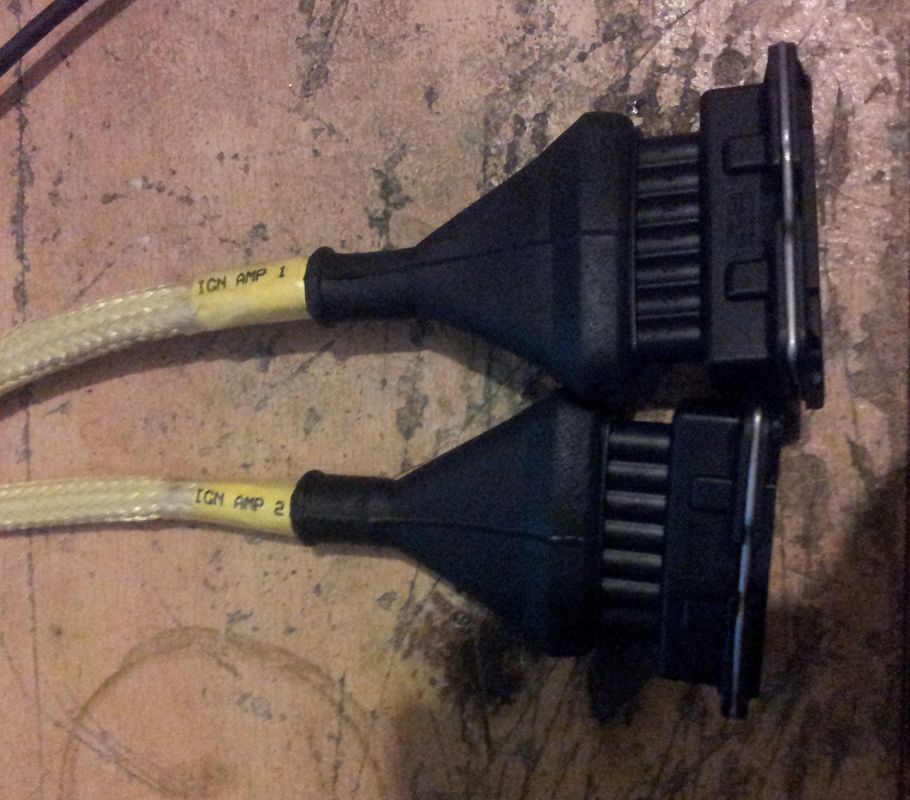
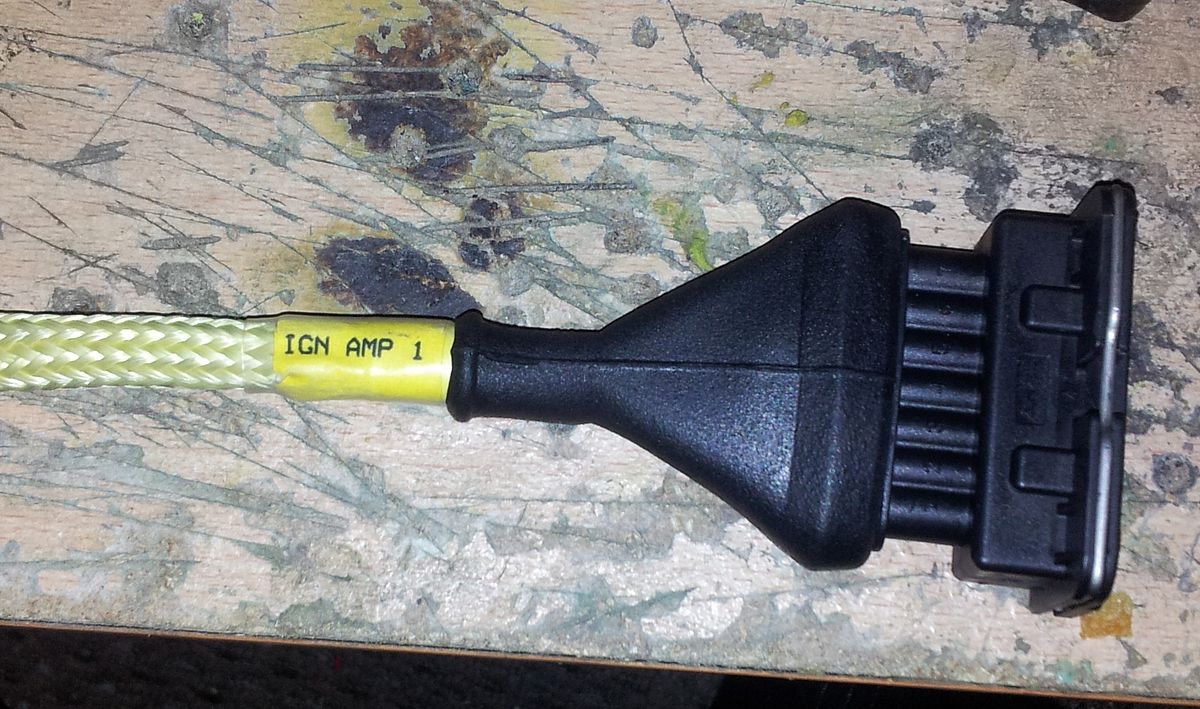
both ignition amps done now. coil/coilpack wire done too with the third wire for coilpack hidden under heatshrink so when i convert i just take off the coil connectors, crimp on the coilpack terminals and connector and job done.

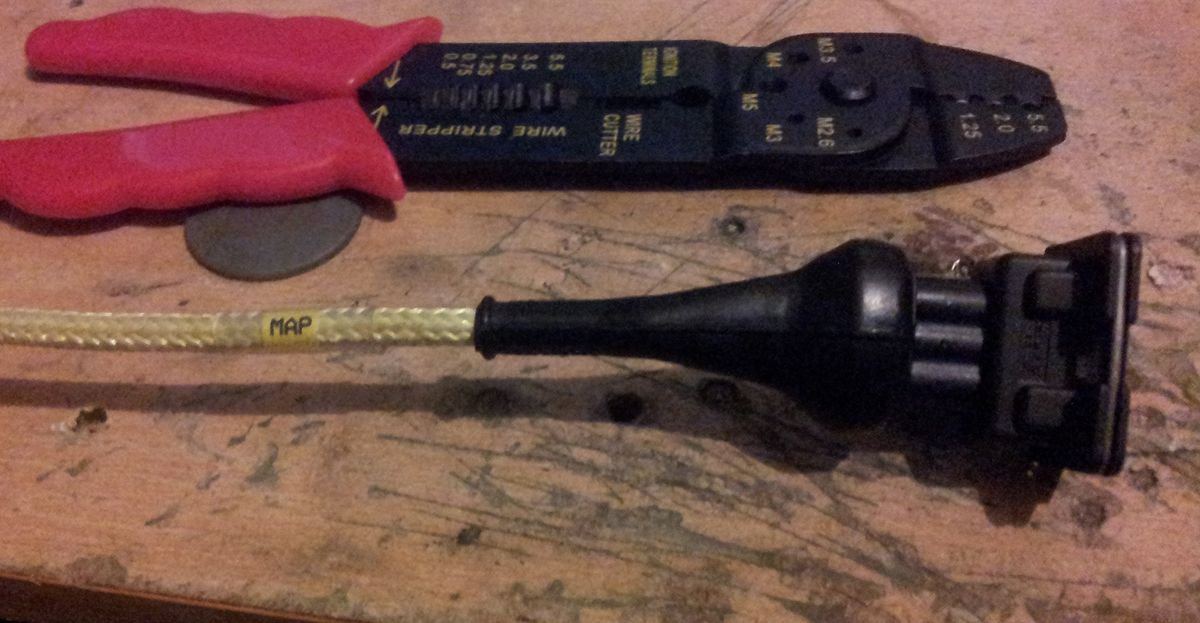
Also done the MAP connector as its big enough for the heat shrink ive got while i wait for the smaller stuff.
20121025_051001.jpg


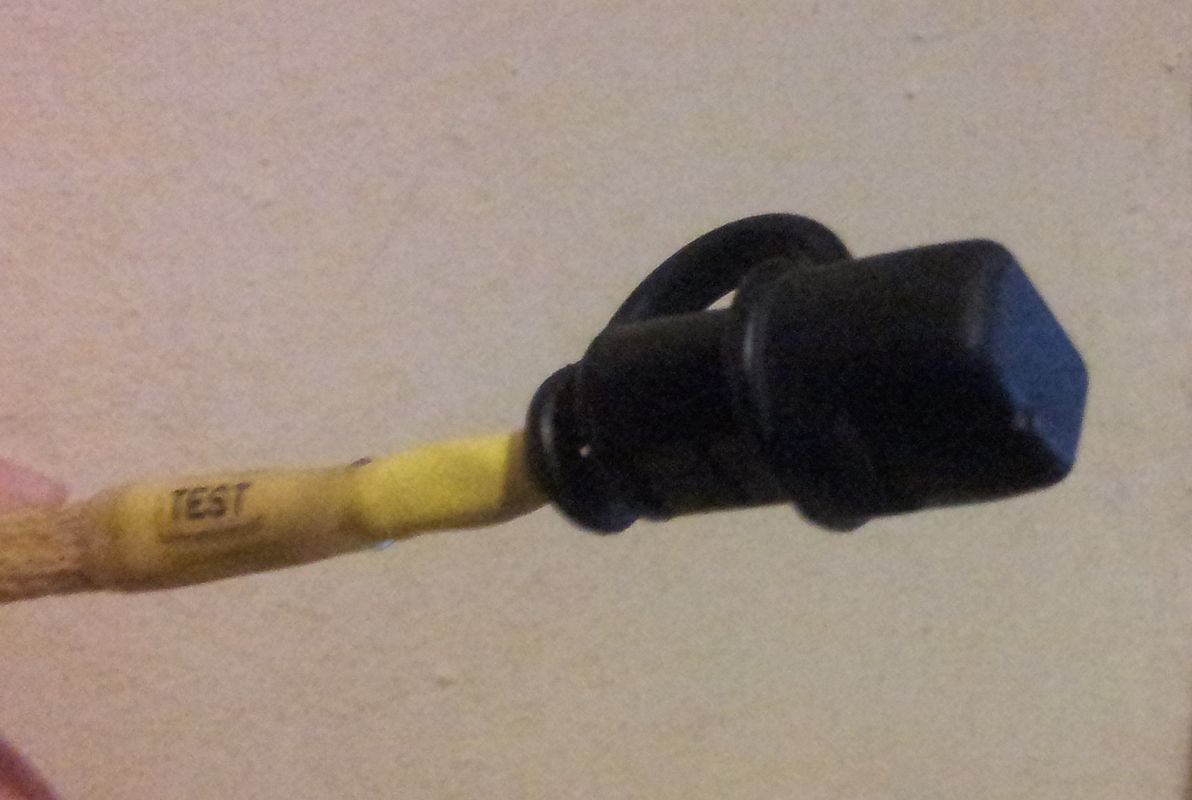
also got some terminals ive been waiting for. The terminals were from a BMW but fit the ford diagnostic plug connector housing i had spare, so now i have the proper connector on my new loom.
20121025_051024.jpg


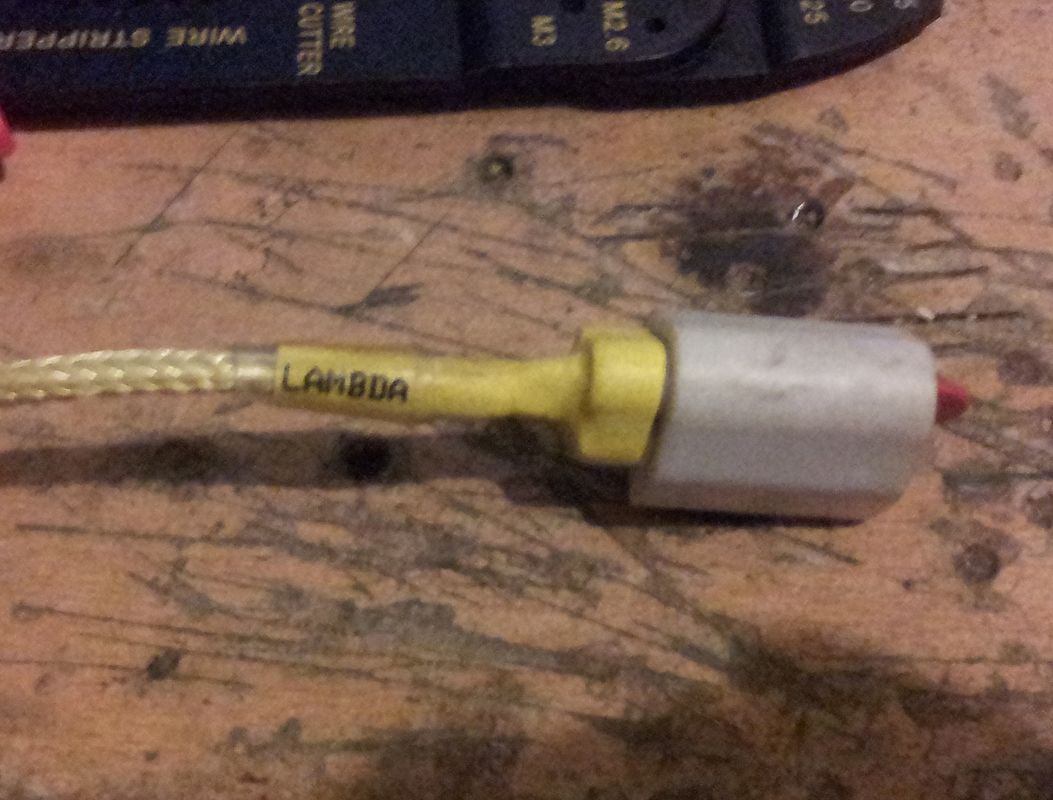
Also got the right connectors for the ford 3 pin LAMBDA connector. Couldnt find new connector housings anywhere so used new terminals and seals in a good secondhand housing. Got a white one to be different to boring black :cry: and also have fitted a blanking end cap as i dont have a lambda on the car yet but will do eventually.
20121025_051105.jpg


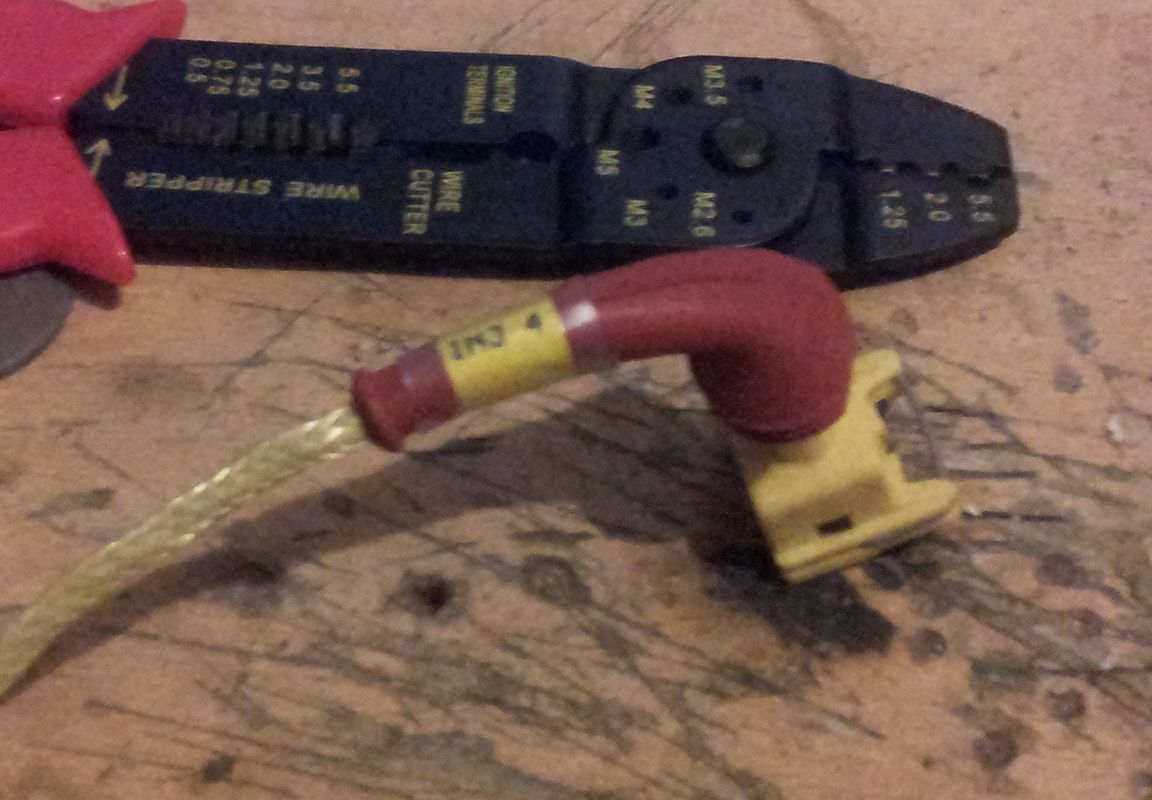
Also done one of the injector housings. Used yellow like ive seen on other looms and also right angle boots (in red!) as i got them free and again not boring black :cry:
20121025_051128.jpg


Done a bit more and it finally is beginning to look a bit like a loom now!
20121029_205323.jpg


Getting neater as i go along and learning tricks to keep things tidy too so if i do a car loom or some small sublooms in the future they will be neater as well.
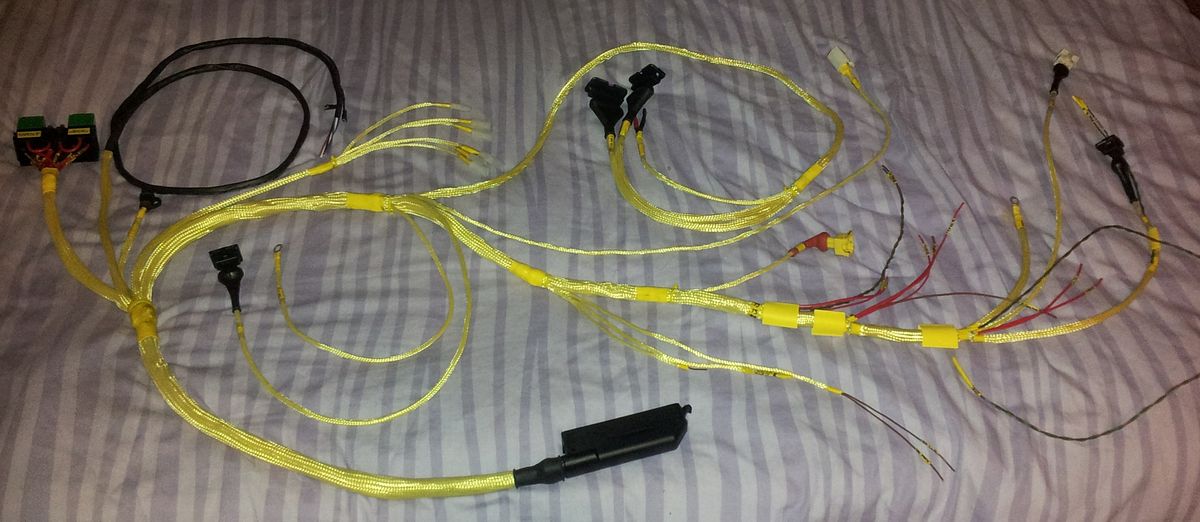
All done! :content:

20121101_045857.jpg


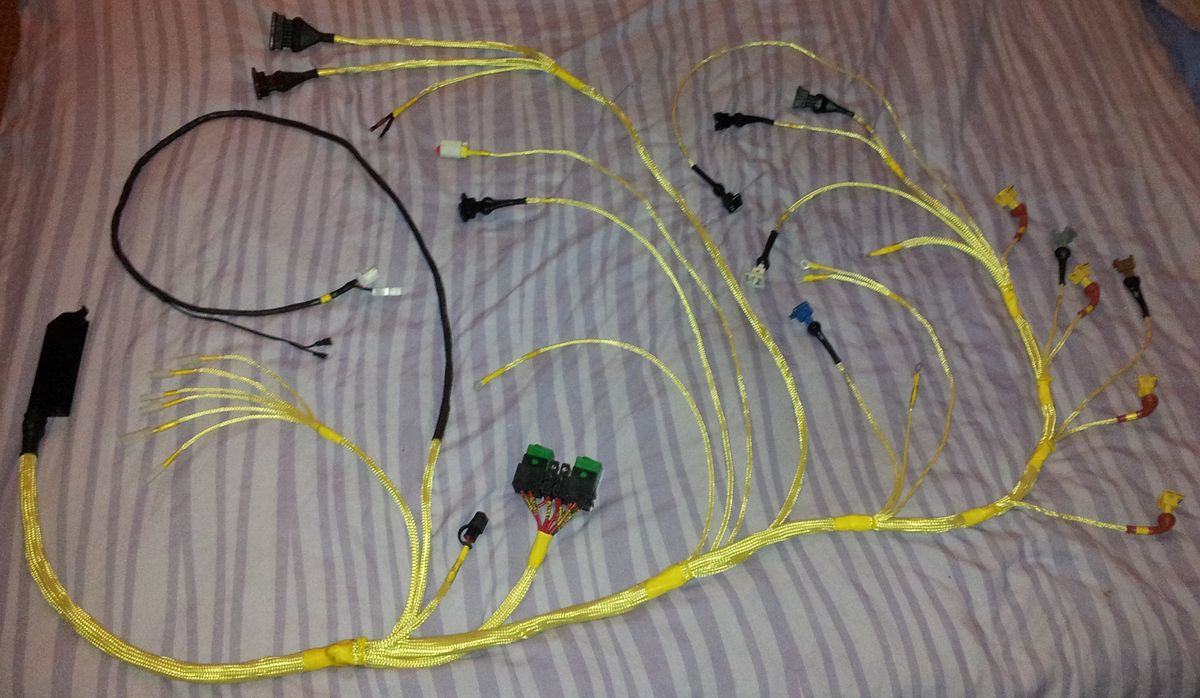
Wont be fitted for a while yet as i need to make all the other engine bay sublooms as im going for a complete front end rewire when i fit the engine loom.

Also will do a set of testing on the complete wire. Each wire has been checked its going from right pin to right connector, and also resistance checked to make sure i have good connections. next i want to again test every single wire now its assembled including a continuity check with ALL nieghbouring wires to make sure ive not damaged it some place during assembly.
 
a christmas day update :cry:

finally got hold of the bits i want from a scorpio rear beam, namely driveshafts and arms. I want these to widen the rear track by 20mm each side as it means i can use matching offset wheels front and rear rather than massive offset on the rear just to fill the arches.

Started with the arms. Stuck them outside and used a load of degreaser on them:
20121218_222106.jpg


then spent ages cleaning them up and attacking them with a wire brush to get all the rust off. Then ive given them a lick of anti-rust primer.
20121225_010736.jpg


Just need to dry weather so i can paint them properly.

Got the drive shafts:
20121215_205503.jpg

Just waiting for some concentrated acid to dip them in to remove all the rust. They are just too big for the sandblaster i have access to sadly.

I seperated the stub shafts off as they can be blasted. So into a bucket:
20121215_202241.jpg


And fill it with coke for a few nights so theres no greases or oils left on them, less sand gets ruined with grease the better.
20121215_202502.jpg


then off to the blasting cabinet. A before and after comparison photo:
20121221_165311.jpg

Much better and so much easier than doing it with a wire brush by hand!! Have polished up the bearing and seal surfaces again and primed the exposed bits. Just waiting for some good weather to top coat them!

Also kept the set of beam mounting plates and cleaned them up too. Before and after:
20121218_163943.jpg

All done including the bolts:
20121218_170236.jpg


I am developing a bit of a sand blaster addiction!! so is my nose unfortunately :cry: cue blowing my nose after a day of blasting and we have:

20121221_175837.jpg

Black snot :cry::cry:

Also been working on a larger washer bottle. The puma bottle is silly tiny and mine has been cut back for 18" wheels so a couple of drives in shit weather and you have to top it up. So i got a fiesta one off my mate jacko. He had cut a bit off for 18" wheels on an FRP.

20121216_014727.jpg


However with bigger arches and a different shape inner wing, i needed to hack some more out to make it fit. So out with the hacksaw:
20121216_213754.jpg


The orange tape is protecting heating element wire i have attached. I always thought heated washer jets were a bit gimmicky as if its a proper cold day it matters not if the jets are heated when all the pipe work and the water tank are frozen up so i have fitted heating wire to the bottle and will do so to the pipework too. its been calculated to draw only 5A and similar set ups achieved 40 degrees celcius so a fire safe temperature yet warm enough to get the job done.

While i was under the arch for the test fitting i checked to see the state of my coilovers. I protected the accessable lower threads with grease then taped over them.
20121216_151044.jpg

took a bit of tape off and they are as good as new. you can see in the photo how the top threads are nicely corroded so good job i taped the lowers incase i want to lower the car in the future.
 
been continuing with general tidying up of the drivetrain parts.

Also took the car to a friends garage so i could have the front bushes replaced as mine were worn out (stoke roads!!).
20121231_124338.jpg


The outer TCA bushes were only a couple years old so didnt last long!!

All replaced:
20121231_132137.jpg


Also thinking of getting my rear turrets cut out and new ones welded in with a more conventional strut top:
20121231_142213.jpg

I want to use normal escos strut top fittings so i can use a matched set of coilovers all round.

The original puma mount had just been plated over and welded up:
20121231_142219.jpg


Also on new years day went out up the cat and fiddle in my mates elise
20130101_142610.jpg


Then had a massive car cleaning session.
20130101_144031.jpg

20130101_144117.jpg


one certainly knows how to celebrate the new year in style!

Also had a go at making a NACA duct at work. borrowed thier mould and equipmrnt.

Laid up the pre-preg in the mould:
20130108_112054.jpg

Pre-preg is so much easier for complicated shapes like that. it sticks to the mould so dead easy.

then bagged it up ready to go under pressure:
20130108_125139.jpg


cooked it through the curing cycle and this was the end result:
20130109_183305.jpg


even the underside looks cool:
20130109_183317.jpg
 
Wow, looks like your carbon fibre skills have really come on, that looks perfect. My wing mirror bases have started to oxidise now so ill have to try again! The bonnet is still looking ok though, not as good as a vac formed one, but its not oxidising.
 
I will be making mirror bases before the summer if time allows. Ive not been in the job long so i cant take the piss too much chucking loads in the autoclave and ovens :twisted:

I am sold on pre-preg though. Its so much easier as its like the carbon has tacky tape on the back and it just sticks where you want it. You can peel it off and adjust it, and also its bomb proof. You can be really rough with it and the fabric is very hard to distort. to get the edges of the carbon in the groove (ridge on edge on part above), my colleague litterally ran the handle of the scissors back and forth while leaning on it with his weight! And i was being gentle at first lol. Do that with normal carbon and youd have a pile of loose fibres!!
 
Along with a wonky weave! Sounds good, can you use pre preg with wet lay up? Ive heard good things about it, but werent sure about wet lay up so didnt bother. Can you cut a neat hole or shape out of pre preg without it distorting and loosing threads, i tried that with normal 2 x 2 and it ended up in disaster!! :?
I really think you should start making more bits for selling, that duct looks like something youd expect to pay a fortune for. I was looking into some new focus RS vents for my steel bonnet when i put it back on, have you seen how much they cost in CF? You could make a killing, i know its time consuming, but once you have moulds, its not going to be that much hassle.
 
You cant wet lay pre-preg as it doesnt work that way. pre-preg has the resin already in it. Its the vacuum, pressure and heat that cures it.

There are pre-pregs that can be cured under vacuum and heat only so in theory you could do it in the house oven, however youd need to drill a hole in the oven for a vacuum line LOL.

I could make some bits eventually. Its finding stuff thats not out there but has good sales potential.
 
Minor update.

Got some new tyres:
20130112_152808.jpg


Mucho thanks to Mark Barber for ordering them for me as there were only two left in stock on special offer and not sure if they are getting any more. They will be going on my speedline wheels. When i get paid next I will get more tyres from somewhere and the hubcentric spacers i need with long studs as i am using group A conversion nuts on my wheels.

Also starting to plan how to address my high ACT's. Been something ive been thinking about a while but not got round to it as its not been a priority.

My "group A" cone filter is basically near the exhaust manifold :cry: Ive made a heatshield to go on soon and i will also be using heat reflective coated carbon to "box" in the cone filter seperate to the rest of the hot engine bay.

I am also providing two cold feed tubes. one just plain simple duct. The second is fan assisted.

I intend to use a 120mm delta fan - yes thats a computer fan!! Its ip66 rated, sealed bearings etc so will be fine exposed to typical road grime and rain. also designed to work on 12V and draws 4 amps.

It puts out 7133 litres per minute.

a similar sized spal fan pumps out only 5833 litres per minute.

the delta fan cost me £29 from the USA (already have them)
the spal equivilent costs £76 from UK.

I have 3 delta fans.

A rough calculation of a 2 lite engines air consumption can be assumed to be:

Engine capacity x RPM = litres per minute.
2

for a cossie its basically the same as RPM when off boost.

Now very roughly lets take into account boost. The more accurate way would be to use a dyno graph to calculate pressure at a given rpm.

however im just going to use peak rpm and peak boost as worst case.

For my car assuming 7500rpm and 2 bar boost.

that means because the engine runs in vacuum off boost (about -11 to 12 psi) then in effect you are making 3 bar of actual pressure to bring the inlet upto 2 bar positive.

so in effect 3 times atmosphere so therefore 3 times as much air for a given volume give or take.

so my cossie roughly consumes 22500 litres per minute of air. so just over the amount 3 delta fans can deal with.


So in theory I could rig up all 3 fans and give or take be able to flow enough clean air into the air filter box to deal with the maximum air consumption of the engine.

Now im not quite that insane so for the time being im just going to rig up one fan (I have space for all 3 if needs be) with the aim of ensuring lower revs and lower boost levels driving will ensure the engine gets a good amount of fresh air.

I may at a later date add more fans but only dependant on the actual results produced.

So time to get producing parts. I already have some suitable lightweight ducting to use. However i need to create some kind of funnel shaped adaptor to enable me to connect the duct cleanly to the fan.

So take 1 delta fan:
20130112_210723.jpg


Take some foam modelling block and glue on a tube that matches the internal diameter of the tubing (so it slides over easily), then get busy with the sanding blocks.

20130112_210735.jpg


And the end result once i mould an adaptor will be:
20130112_210748.jpg


im going to use the foam plug ive made as a rough mould by sealing it and release coating it. i will then wetlay it with carbon. It will be rough and ready but a few minutes with a bit of sand paper and the inside will be nice and smooth.

its going to be hidden so not even going to try to make it look good as its a waste of my time!! Will reserve the fancy moulds and pre-preg for the cosmetically important parts!
 
I think its a smart idea, but unless you are running the fan constant, or there are other inlets to the airbox the way you have it set up will cause a restriction in flow when switched off. In theory, if you were to switch the fans on off boost, they may help spool the turbo up a little!!
 
Oh ok cool, great set up then!! How are you going to switch them on, manual, or an RPM or boost switch? I thought about fitting something similar to my intercooler that switched on at around 10psi
 
Have you tried hammerite dip, it is fantastic did a few castings on my car with it and it comes out like it is blasted.

Simon

warrenpenalver said:
a christmas day update :cry:

finally got hold of the bits i want from a scorpio rear beam, namely driveshafts and arms. I want these to widen the rear track by 20mm each side as it means i can use matching offset wheels front and rear rather than massive offset on the rear just to fill the arches.
 
Bit of an update.

Biggest change is I've finally taken off the RL7's and fitted the speedlines ive had in my basement 2 years! Only just been able to afford 4 new tyres now im working.
20130126_154105.jpg

20130126_154046.jpg

20130126_161249.jpg

20130126_163545.jpg


Im sure some wont think white goes with silver, but i couldnt give a damn because long term the car will change colour anyway.

This project was the first one i ever did. The moulds were made a few years ago:
28012011328.jpg

02022011343.jpg


I tried it wetlay and infusion and couldnt get either to work properly.

So instead i moved onto pre-preg. It was sooo much easier to lay up the part:
20130129_193915.jpg

that was the surface layer.

Made a template for the backing:
20130129_194537.jpg


You can see how sticky the pre-preg is:
20130129_194843.jpg


the next layer was then added:
20130129_193928.jpg


The whole lot was then put in a vacuum bag ready to be cured:
20130129_234438.jpg


Once cured they were trimmed:
20130131_183903.jpg

I am well happy with the finish! just a little sanding for smooth edges and it will be ready to fit!

Also decided to get my extinguisher mould out again. Remade it in pre-preg.

Had to post cure the mould to ensure it would work at the required temperature.

The layup is slightly different with the fabric being cut into three sections so there can be a little movement in the tight corners allowing the fabric to fill the space so no bridging.
20130126_111708.jpg


fully laid up:
20130126_115238.jpg


Just after i finished with the dremel:
20130131_223945.jpg


Needs slots cutting out, edges tidying and a polish and its done!

I also did the same with my gear lever surround. Used my previous template measurements to cut some Easypreg Surface layer to the necessary shape:
20130119_111905.jpg


You can see the shiney surface here:
20130119_111914.jpg


I then started to carefully lay the pre-preg into the mould:
20130119_114601.jpg


Notice the tool i borowed to press the fabric right into the tight corners.

once i was happy with the first layer, I used some 400g vari-preg as the backing layer. Its just going in here:
20130119_123110.jpg

I used some odd shaped offcuts to save wastage and as its a cosmetic trim piece it doesnt matter from a strength issue.

The backing layer all done:
20130119_125457.jpg


Then it was time to finish the layup and draw a vacuum:
20130119_140509.jpg

extra care was taken to ensure the bag got into all the tight corners. You dont want bridging as it can ruin the part.

It was then cured under vacuum at 90 degrees over night (over the needed 10 hours).

After demoulding and trimming this is the finished part:
20130124_223234.jpg


All finished ready to go in a car:
20130131_193148.jpg
 

Latest posts

Back
Top