The £650 Puma

ProjectPuma

Help Support ProjectPuma:

This site may earn a commission from merchant affiliate links, including eBay, Amazon, and others.
Started painting the callipers today. Hammerite does seem to give a good covering even when it's just brushed on.

First coat;

24434135920_0ca32257c8_b.jpg


24636158521_00eb75ba52_b.jpg


Have also given Rick's disks a clean up with some wire wool and brake cleaner.
 
The Arch Bishop said:
[post]346035[/post] Started painting the callipers today. Hammerite does seem to give a good covering even when it's just brushed on.
I brush painted mine in situ with Hammerite HT Silver and then look fine. Only used the high temperature version because I had done the manifold with that and that's what I had around. :)

Originally, I had done them in red oxide, just to see if it was worth going for a proper gloss red finish - the prop alloys cover the calipers up too much much for that, I reckoned. The silver looks good and stands out just enough without being OTT.
 
They look great in silver judging by Wild E's thread, and as you say, the props don't show a lot behind there anyway! The colour of my car also doesn't really lend itself to red, yellow, blue or anything really.
 
Ah... soggy carpets.. my old nemesis...

Dragged Jegger out today after a month or so of him sitting on the drive. I had to charge the battery overnight as he wouldn't start yesterday (the battery is getting on a bit). However, after starting up, the windows quickly steamed up. A quick feel of the passenger carpet and yes, the carpet is sopping wet.

Pretty sure it's not from the bulkhead now an I seem to remember seeing a dribble getting in at the bottom of the door shut. Some further investigation is required!

Jegger is officially the soggiest car I've ever owned!
 
The Arch Bishop said:
[post]345992[/post] A large parcel arrived yesterday courtesy of ArtfulHussy which should knock one of the items off of my list!

24087413883_fa78a82f20_b.jpg


A pair of ST150 callipers, ready-shotblasted and complete with repair kits and new pistons. As an added bonus, they have a set of Goodrich braided hoses which may be a better length than my Hel lines (which are too long and occasionally rub).

May I ask you where did you get the overhaul set? And if you can measure the pistons using caliper gauge, please?

I think my RHD caliper is seizing a bit what is causing slight vibrations while braking and would like to replace the pistons (what I didn't do when was the time - Idiot!)
 
Be careful with universal spacers, I used a pair of 3mm one's on a couple of track days running props and where the ford spec holes are (double open holes) they hang off the studs rather than sit properly and so its pretty much impossible to get the spacer central to the hub when sticking the wheel back on, not dangerous as such but I didn't like it for track days.
 
My dad used to have these spacers on his Puma and it caused wobbling in the steering wheel when going over 60mph. Not trying to scare you though was very minimal.
 
Could get hub-centric spacers, but more expensive obviously. I have a set of 4 on mine of the bolt on type but they are 20mm.
 
I think 3mm spacers may be too small for hub-centrics (unless I'm confusing the term), but if the ones that I've bought don't centralise properly, I'll ditch them and have some made up to fit properly.

For the price I paid, they're worth a go, but I'm not expecting them to be great.

I'll suck it and see!
 
Despite my claims to be a fair-weather Puma tinkerer, I have been trying to sort out an issue that's bugged me for the best part of 4 years, namely the unresponsive coolant temperature gauge on the dash.

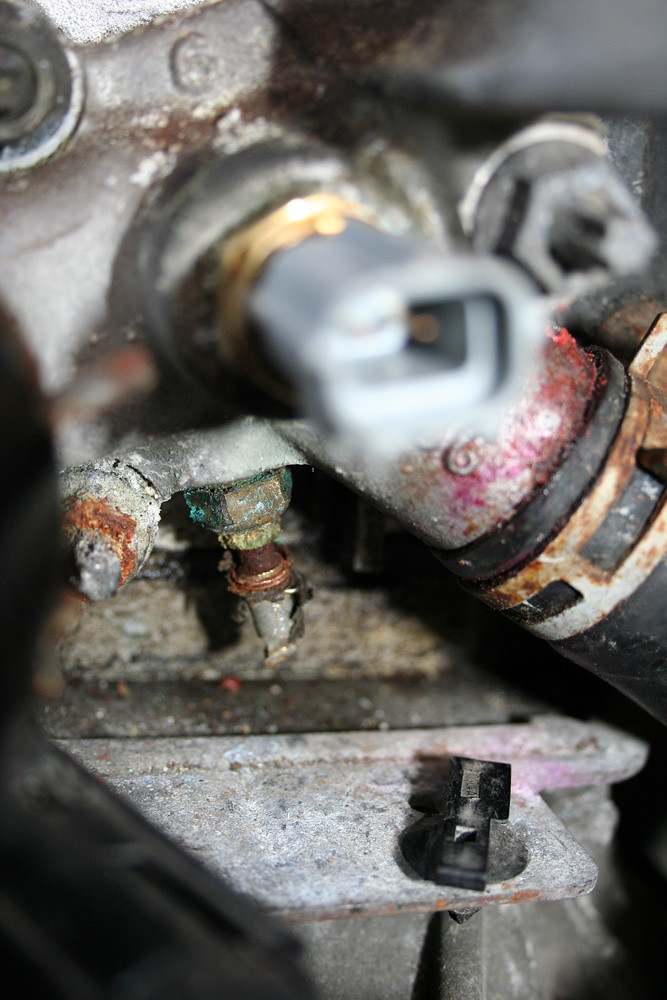
I stumped up the cash for a genuine coolant temperature sensor - the one that sits just below the coil - from Foray Ford (Ford parts UK - who are superb by the way) and swapped it over. The result - no change. It was then that some Project Puma support tracked down the lesser-spotted single wire sensor that hides below the other coolant sensor well out of the way of prying eyes;

25014351450_d2c36953d5_b.jpg


You can see that it sits in a gap that makes it pretty flipping difficult to actually see let alone fiddle with. I tried removing the little rubber boot that covered it which also, annoyingly, removed the wire entirely - also as you can see from the image above.

After about an hour of colourful language, I'd managed to somehow crimp a ring connector onto the remaining 3 inches of wire buried down in the engine bay and cut a rough thread on to the sensor so I could clamp the ring connector to it using a stainless bolt. The original wiring connector would appear to be a sort of push-fit, for future reference.

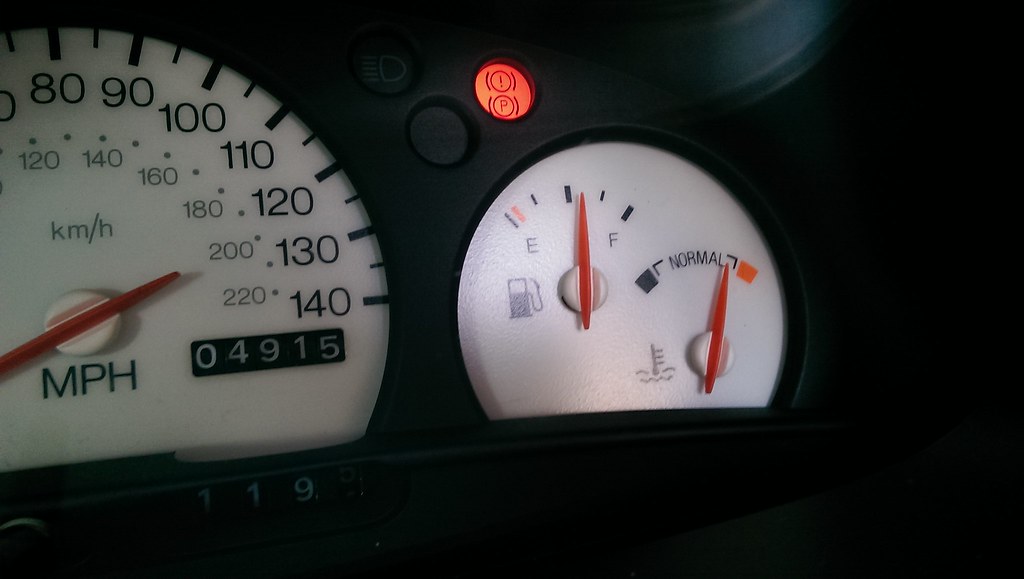
The result of this was this;

25350690395_de149db40d_b.jpg


Now you'll note that the gauge is showing somewhat high! This was due to me not remembering to screw the flipping expansion tank cap back on properly and then going for a spirited thrash. Luckily, it was a short drive and the engine did not overheat, but it proves that I'm both forgetful and a bit rubbish! :grin:

Full story on this that clearly displays why this forum is brilliant is here - http://www.projectpuma.com/viewtopic.php?f=19&t=29307

I've also ordered 4 new tyres for fitting on Saturday. The Falkens that I have are not totally worn out yet, but they are now a good 4+ years old, the grip has dropped off and I suspect that they are responsible for a few issues, namely quite strong tranlining (yes still) and a crashy ride. Falkens have very hard side walls which is great for changing direction, but not great for anything else. I think the Puma can take a bit of softening off on the turn-in, so I've gone for some Toyo Proxies this time.

It also gives me the chance to finally fit the rather nice set of ultra-tidy prop alloys I've had in my shed for about 3 years!
 
That was an epic issue vs resolution, well done for getting to the bottom of it in that other thread, was great to see it come to a head!
 

Latest posts

Back
Top