JASAPP

ProjectPuma

Help Support ProjectPuma:

This site may earn a commission from merchant affiliate links, including eBay, Amazon, and others.
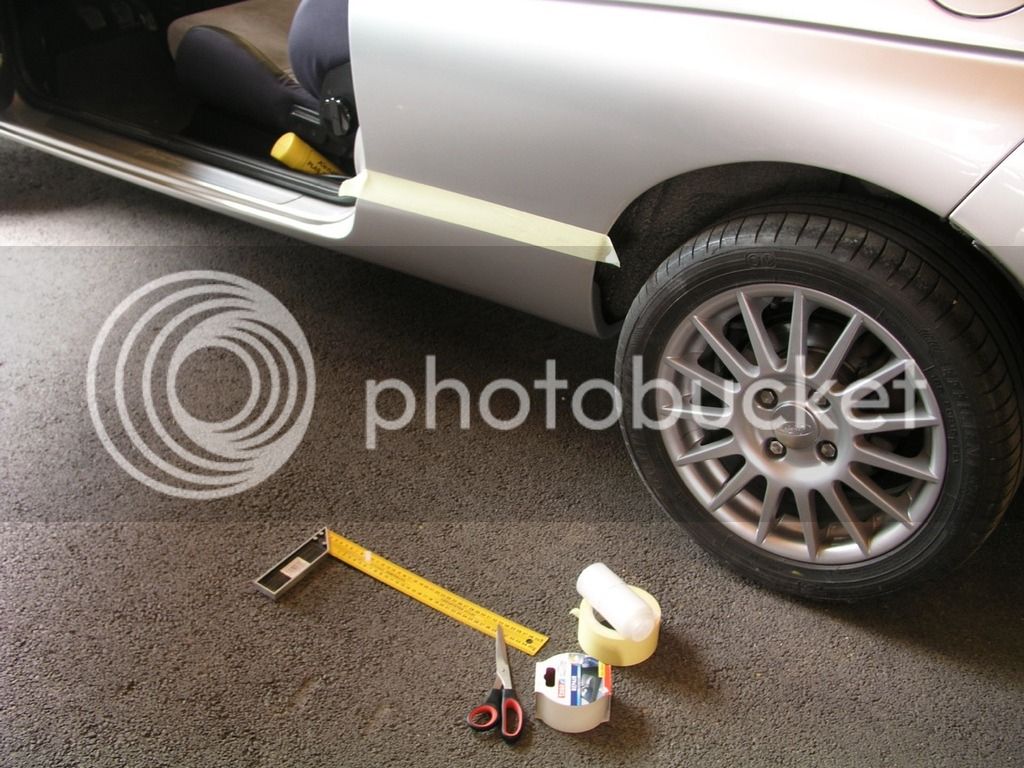
Got the car taped and protected (I hope!). It was half an hour job, if it holds up to its promise, it will be most probably the best spent half an hour so far!


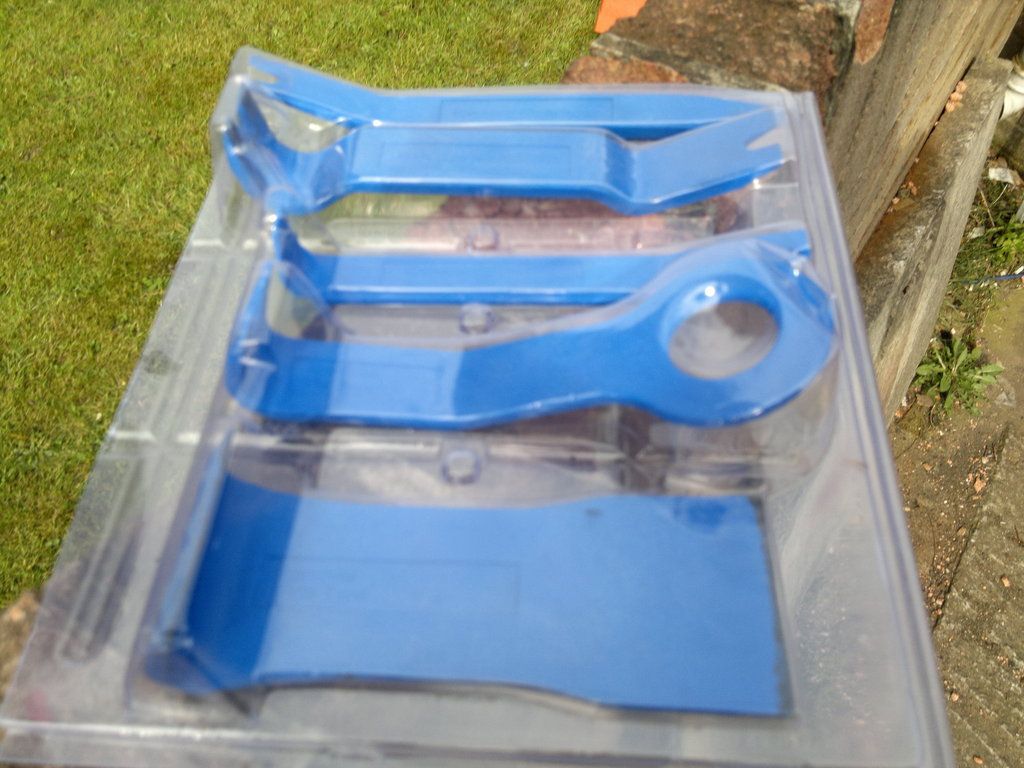
This are the products I am using. The wide tape is meant for this purpose, the other one is meant for cabrio 'windows' repair so it has a milky shade, but both tapes are thick, durable and have excellent sticking properties!

The masking tape is there just as a guide for the protecting tape


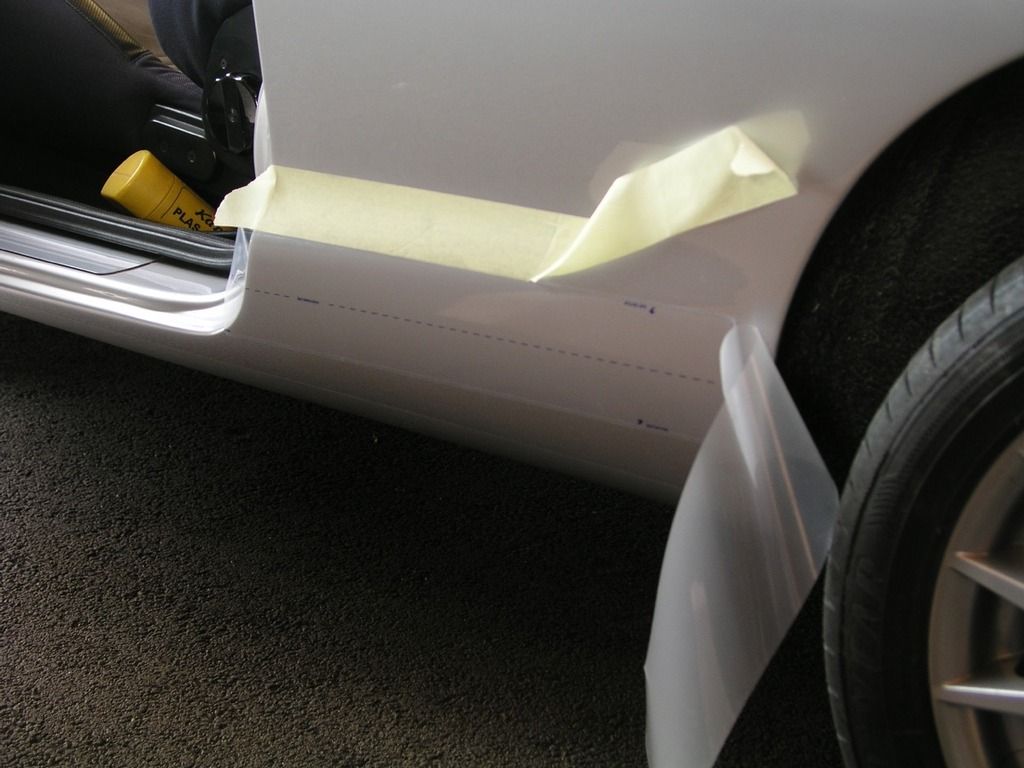
And the proces of applying it. There are three parts to it: the bottom one which is protecting the sticky side, and the top cover that is protecting appearance


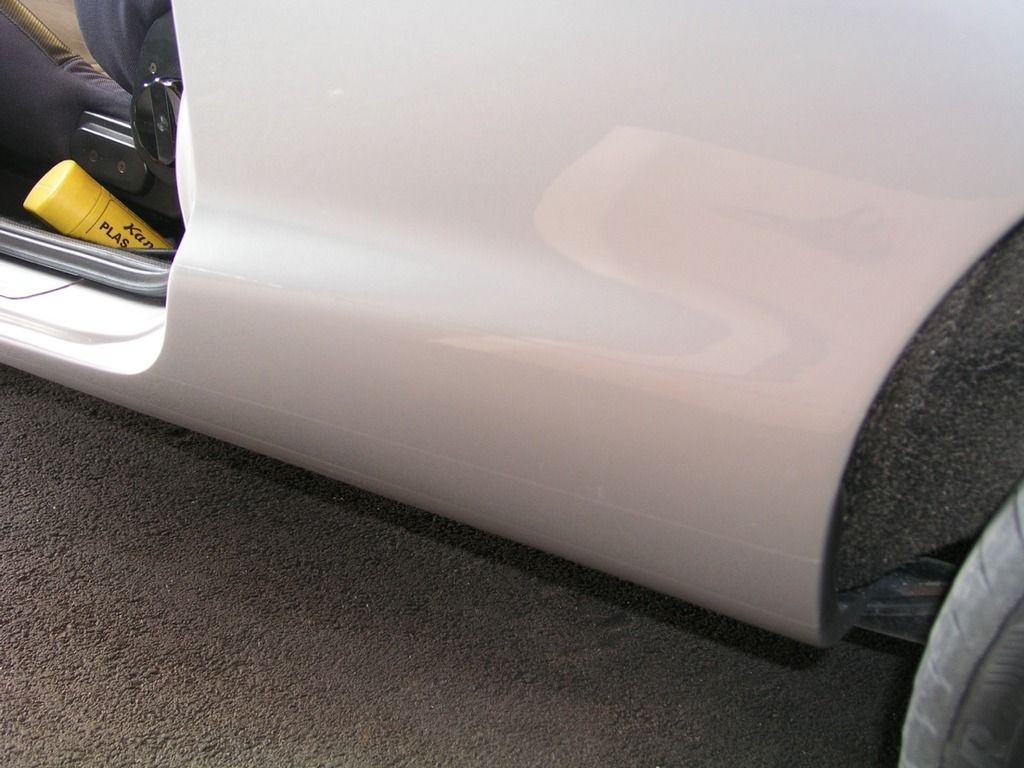
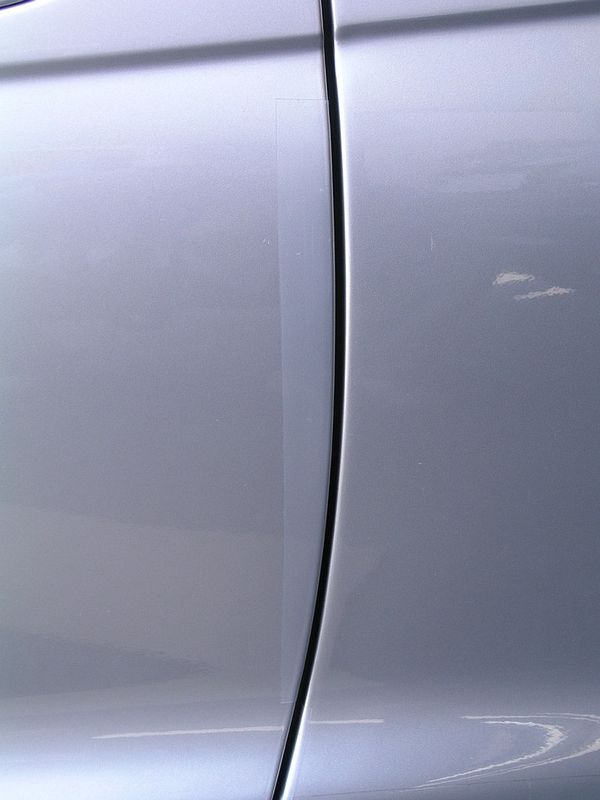
And how it looks in the end. Tesa says it is invisible and surely looks that way!


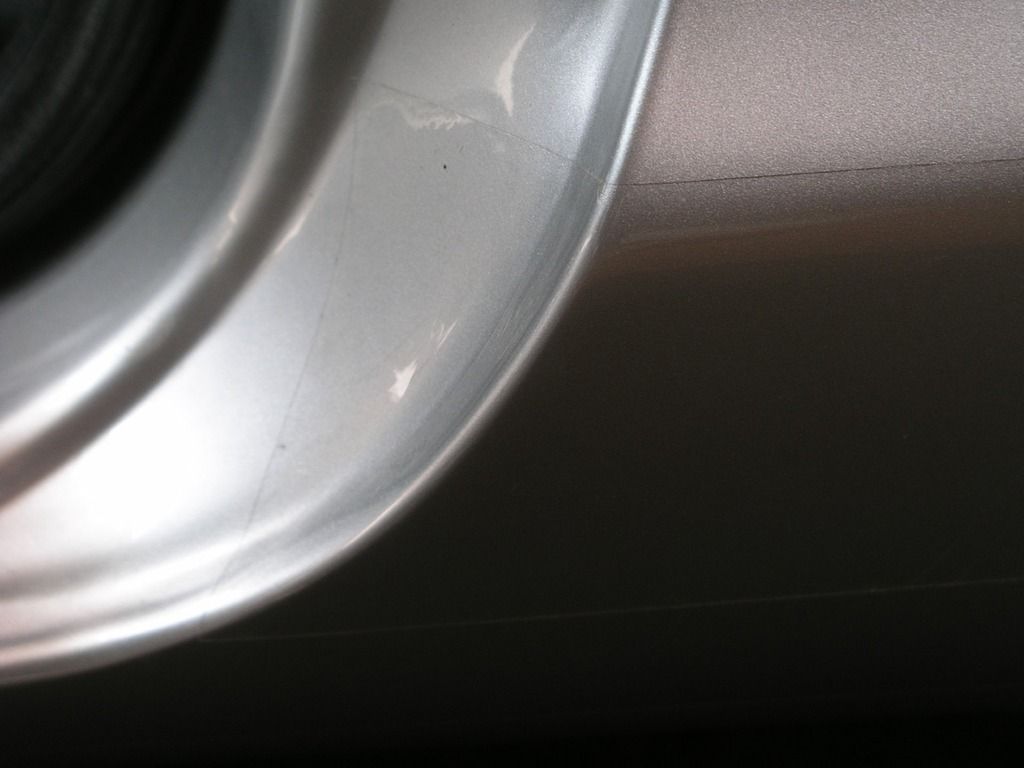
The part that got the worst of the winter and where the paintjob got sanded away. The tape is following curvature very nicely


Did also the end of the doors to protect them from hitting something while opening it with the other tape (which is packaged more generously; the role is 10 m)


And the other side


It is nearly invisible and looks very solid product. I hope it will live up to its promise
 
Is it like a clear-bra, those things that they fit to high end cars and cars that just got a new paintjob?
End result looks good and not really visible if you don't know it's there.
 
I would think it is the same stuff that you get on some newish cars like toyota yaris, some renaults as well have it for protection, only is the sticker much smaller. Usually it is to be found in front of rear wing.
Not like the transport protection on high-end cars, if that is what you meant. This is REALLY thick and strong stuff. That is why I posted pictures of it to know what to look for.
This is it: http://www.tesa.com/consumer/auto/protection/tesa_auto_protect_anti_scratch,c.html" onclick="window.open(this.href);return false;
 
Yeah that's what I meant. Looks really interesting. My Puma will probably have to have some repair/paint work in the future so will be good to protect it after the paint gassed out. Thanks for the tip :eek:k:
 
Hi Sinisa
Good work as usual, that stuff looks similar to what they used on MK1 Focus RS's to protect the rear wheel arches from front end stone damage.
Barry
 
Cheers, Barry! I think it is the SAME stuff! It wasn't even that expensive. I know how expensive those stickers are if you go down the OEM route, but this is really reasonable
 
I used to do this years ago on motorbike lower fairings using clear Fablon.
It really stopped stonechips and kept the paintwork as new.
 
Since the weather improved here beyond words (if I wanted complainig, I could that it has become to hot with temperatures approaching summer vaules already with 25 and more degrees C!) I used that to do some work. First was the scuttle pannel. It faded a bit so I took it down and gave it respray in matte black after priming it with plastic primer.
Also, at certain engine speeds and temperatures it would start vibrating what was driving me nuts. To preven that, put on some CCF (closed Cell Foam) at back. It is insulating stuff used on buildings and air-conditioning systems. Being closed cell foam means it won't take any water in (unlike a regular spounge). That has helped to reduce vibrating of the panel which got slighlty deformed during time and isn't seating properly.


Sorry, I know it is a crap photo, but...

Also, showing the CCF beneath it


It is working as the noise is gone!

Encouraged by that decided to change the weather strips. Bought new ones few months ago. Have been delaying it as that would mean dismantling the doors and taking down the doorcards and rearview mirrors. But, the weather was to good, so got on with it. At the same time took the opportunity to enhance the sound insulation with that CCF. This is the stuff I am using. It is vry effective and very cheap, so would recommend it to everyone! http://www.k-flex.com/products/elastomers/k-flex-st#product-range" onclick="window.open(this.href);return false;


I am using 8 mm thickness, a rolle is 1,5 m wide


Dismantled both doors...


And put it on outerskin from inside. It has one side that is very sticky. A bit fiddly, but once you get the hang of it it is doable...


The old weatherstrip taken down.


They were very rusty at the end near the rearview mirror and started bubbling from inside. Also, the rust was transferring to the door frame. Luckily, caught it just in time: no rust has infected doors and it all just cleared off.

And the end with new weather strips in place


Must also say that greased the runners for windows inside doors. With new weatherstrips that has imrpoved operation of power windows beyond description! The electromotor was struggling to get the window up before, now it goes without strain. The old weatherstrips were full of various crap (including a buildup of a moss of some kind) that was slowing the window in its operation.
Cleaned the inside of doorcards that are attached to the windows as well the best I could using a brush and warm water and that has also improved things.

So my advice to anyone with windows that aren't operating as they should would be to change the weatherstrips and clean everything and grease the runners. After that it works like a charm!
 
Hi Sinisa
Yet another top job :) . How did you get on with the door card fixings as the part that clips in to the door (rather than the ones in the doorcards) are very prone to breaking?
Barry
 
TBH, I read ElDude's guide on pumapeople prior to my ICE installation and prepared in advance!


Having said that I have to be honest and admit that NONE of clips broke on me! When I was dismantling doors for the very first time it was still coldish and used a heat gun to soften them up a bit and none of them broke. I has mishap with the doorcards as documented in my ICE thread, but the clips were all ok. Same thing yesterday. It was 25C or more and none of them broke. I had to replace one as the male part on doorcard was missing so put on new one. But the original clips are very durable and soft enough to survive dismantling process! I always use a large (like Delboy would say, a large, I said a large...!) screwdriver to push the doorcards precisely in the area of clips and haven't had any problems whatsoever!
 
Hi Sinisa
I managed to break about 8 on mine on both doors even though I used a large bladed screwdriver like you but it was probably a lot colder over here when I did mine. About a year ago I found these at an Autojumble so, hopefully, I'll not break any any more.

160420152001_zpsifwdjehc.jpg
 
Just heat them up a bit with a heat gun. It will be enough to soften them up and they should survive dismantling process. And use original Ford ones. They are miles better than the eBay clones. When it comes to plastic products, I strongly believe in Ford products
 
Hi, guys

Had a mishap yesterday. Driven off the road by the fastest car in the world (of course, the white delivery van who blasted on a narrow road) and my front tyre got cut on the edge of tarmac. The sidewall was cut through so had to buy a new tyre and get the geometry sorted as well. :( :( :(
Also, had to use the spare tyre which was never used before.


When got home took the opportunity to make it look a bit decent and gave it jet wash at first. Turned okish, although it was rusty in places


The tyre has DOT marking 0301 (3rd week of 2001) but was never used as proves the green marking on the thread


After it dried used wire brush to take down the rust and sanded it as good as I could with 80 paper

Primed


And coloured black


And without masking tape


It looks much better, is protected, but could use a real sand blasting...

And the cost: new GY efficient grip performance 42 GBP (converted) plus geometry 12... The wheel is sligthly kerbed, but inside so it isn't visible, but still :x
 
Hi Sinisa
It sounds like the Croatian delivery drivers drive like Italian delivery drivers .....mad!
Barry
 
Had a go at refurbishing the throttle body the other day. Dismantled it completely, changed the bearings and cleaned it. After that primed and then gave it a spray in silver...
The outcome:


Then cut a new gasket...


And finally, the TB installed:


Number of shiney things under my bonnet is growing :lol:


Unrelated, but still: FORScan told me I had an issue with PSP (power steering pressure) switch. Got another one from Ian. What is the PSP switch used for? It is a switch that detects the pressure in power steering fluid and sends a signal to PCM to act accordingly. Default state of the switch is closed and that connects pins 31 and 91 on PCM. When pressure rises the switch opens and pins 31 and 91 get disconnected.
I tried the switch with multimeter and it was closed with engine of. I suspected the wiring was not good (as ususally is the case) so disconnected PCM and tried the circuit through pins 31 and 91. It read short circuit, so it was OK. Turned on the engine and had someone turning the SW and discovered that the switch doesn't open. It was stuck closed i.e. connected.
Took it off (the biggest problem was undoing it and not breaking the line) and while the fluid was dripping put in the new one. Strated the engine and could tell the difference; as I would turn the SW revs would rise slightly, just as it is supposed to be doing.
While at it, checked the clutch switch but that one was was fine.

So, happy days!
 
Well done Sinisa
Another problem solved by Forscan, I'd have been stumped if this would have happened to me :-(
Barry
 
Been busy today. It was nice weather, had some stuff in a box waiting so.....

I guess pictures will do all the talking :wink:


Got them on eBay in really nice nick, almost as good as new. After cleaning them put them on engine just to check if it is a complete set


And then got on with it!

Drained the cooling fluid to be reused as it is old less then a year.


This dropped out of a system as a witness of a total collapse of HCV almost two years ago...


Fortunately it didn't jamm in the pump!

Took down the housing of temperature sensor as well and gave it some attention while I was chnaging hoses...


Of course, in each hose there was some coolant left so it was messy. Still, with some brake cleaner cleaned it all.

Put on the gearbox the hose clip that was missing. It was broken, so tapped the gearbox housing and secured it with an M5...


Putting hoses on. Fortunately didn't have to take down the alternator, managed to do through the headlamp opening!


Cut new gasket... (0,5 mm thick, plenty enough)


Hoses connected, housing back in its place with the coil pack back on


And everything in place!


Put the cooolant back in, added some 3/4 of liter of antifreeze, topped up with water and bled it!
 
Hi guys,

Posting some developments with my JASSAP. The A/C compressor developed a serious leak at the housing where the two halves meet. Just in time for the some of the hottest summers we ever had! :twisted:
Anyway, ordered one from Ian G, he prepared it for the shipment and than the courier didn't come :| !
He sorted that one (thanks, mate, really appretiated!), then it took some serious time for the compressor to arrive and finally could crack on with it. It was dirty as to be expected so had to do something about it (nothing dirty will get on my car! :wink: )
Plenty of brake cleaner, sand paper, wire brush, dremel and hour and a half later it was presentable. Barely, but ready for a coat of primer


So, time for priming and few minutes later....


After half an hour or so, finishing coat of silver...


And another shiney thing under my hood... Still oily here, but that was cleaned


Since then the temperatures have climbed here and it was installed just in time...


The air conditioning is working like charm, the cooling is excellent and I think the engine works nicer i.e. is under less stress then before with A/C switched on
 
FORTY ONE DEGREES!?!? :shock:

I love your car. It always inspires me to make mine as clean and tidy as yours it, but then I start working on it... :(
 

Latest posts

Back
Top